

A metal desk calendar ends up on almost every desk and stays in view there for months. That is exactly why it is perfectly suited for placing an advertising message permanently. But before the calendar goes to print, you have to overcome a few hurdles: finding the right template, building the layout correctly in InDesign, complying with the provider's print specifications, and finally exporting a reproducible PDF.
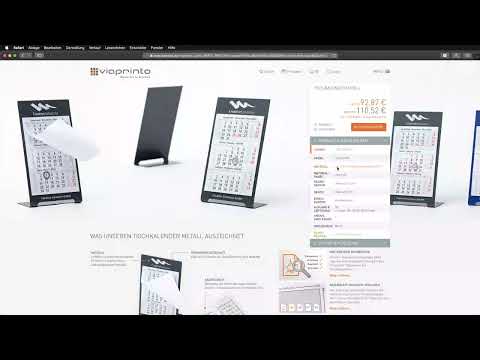
The video is only loaded from YouTube when you play it – data (including your IP address) is then transmitted to YouTube/Google. More in the privacy policy
This guide takes you through the complete workflow. You start by downloading the template, then design the header and footer areas, export the file, and order the calendar from the provider Viaprinto. Finally, I will show you what to look out for during unboxing so you can realistically assess the print result.
Key Takeaways
The provider's template saves you a lot of time. The design areas, margins, and punch-outs are already set up correctly. All you have to do is design.
Use vectors exclusively. Logos and text must be provided as paths; pixel images are not permitted for this product.
Stay within the design areas. The header and footer offer space for your message, but elements must not be set up to bleed off the edge.
Less is more. A clear logo, a short message, and a claim have a stronger effect on metal than overloaded layouts.
Export with the right settings. A PDF export according to the PDF/X-1a:2003 standard with embedded fonts is the basis for a clean print result.
Use the provider's data check. A green checkmark shows you that your file is reproducible before you order.
Step 1: Download the Right Template
The first step takes you to the provider's product page. There, under "Data sheet and file templates," you will find the suitable template for the desk calendar. For Adobe InDesign, you download the corresponding file. The download contains several formats. The IDML file is backward compatible and can also be opened in older InDesign versions. The INDD file is the current InDesign format and is suitable if you work with the latest version.
Also decide on the desired material. You can choose between brushed stainless steel and powder-coated sheet metal. Powder-coated variants look colorful and are well suited if your logo uses strong colors.

Step 2: Open the Template and Understand the Structure
By double-clicking the template, you open the document directly in InDesign. Take a moment to analyze the structure before you start designing. The template contains two design areas: one in the header area for a prominent message and one in the footer area. Between them lies the punch-out, where the magnetic calendar section will later sit. The punch-out is marked so that you do not cover it with design elements.
The dimensions are also important. The template already takes into account the margins of 5 mm to the sides and 2 mm to the calendar block. So you do not have to calculate these values yourself, but you should always keep them in mind when placing elements.

Step 3: Working with Layers
So that you do not get lost in the document, you work with the Layers panel. The design layer contains the areas where you place your message. The information layer displays dimensions, margins, and notes. Hide it as soon as you no longer need it so that it does not interfere with your design. However, show it again before the export, or delete any auxiliary elements that do not belong in the file.

Step 4: Transfer a Logo or Design from Illustrator
Many designers create logos in Illustrator. Copy your logo with the Selection tool and paste it directly into the InDesign workspace. Alternatively, drag and drop the file from Illustrator or another program into the document. Make sure that all elements are provided as paths. This way they stay sharp, no matter how much you enlarge them.
Then position the logo centrally in the design area. The magenta guide shows you when the object is exactly centered. If you want to scale the logo down, hold down the Shift key so that the proportions are preserved. In addition, the Alt key helps to scale the object from its center point.

Step 5: Placing via File and Place
If drag and drop doesn't work for you, use the "File" and "Place" command or the keyboard shortcut Command plus D (on Windows Ctrl plus D). This lets you place a specific file directly onto your document. Note an important restriction here: pixel images are not allowed for this desk calendar. Use vector files exclusively. This also applies to logos that you import from Illustrator. Text that you write in InDesign is also vector-based and is unproblematic.

Step 6: Designing the text in the footer area
Now you place a message in the footer area. Select the Type tool, start the frame on the left and drag it to the right edge. Enter your text, for example a short claim such as "We bring you online". Then select the text with Command plus A so that you can format all characters at the same time.
Choose a suitable font. In the video, the font Exo is used, which you can download for free from the internet. Activate all caps, center the text and adjust the tracking so that the letters look harmonious. In the example, the instructor sets a font size of 200 pt. When choosing the font style, make sure it is not too thin. Fine lines quickly disappear on metal. A good contrast between text and background is just as important as legibility from a certain distance.

Step 7: Creating colors as CMYK swatches
Now you need colors for your design. Create them as new swatches by clicking "New Swatch" in the Swatches panel and entering the values. Make sure the color mode is set to CMYK, since printing is done using the CMYK process. Select the text to which you want to assign a color and click the new swatch.
If you want to pick up a color from an existing logo, use the Eyedropper tool. Select the text, choose the eyedropper and click the desired shade in the logo. InDesign automatically adopts the color value. Here too, you can save the resulting swatch directly as a new color.

Step 8: Simulating the future calendar
Since the calendar appears black in the finished version, you can assess your design more realistically in advance. To do this, draw a rectangle over the entire area, fill it with black and use right-click and "Arrange" to send it all the way to the back. You can now see how your design looks on a dark background. Remember to delete this auxiliary rectangle again before exporting. To do so, select it and press the Delete key.

Step 9: Streamlining the design
The video emphasizes an important design principle: less is more. The finished design consists only of the striking logo in a modern polygon style and a claim in the footer area that formulates the message as a call to action. Do without additional elements that distract from the core. Only then does the message remain clearly recognizable on the metal.
Step 10: Checking the print data against the data sheet
Before you export, it's worth taking a look at the provider's data sheet. There you will find all the important information. First check whether you have chosen powder-coated sheet metal or stainless steel, since both variants have their own specifications. The design elements may only lie within the design areas. Bleed is not possible. In addition: use only vector graphics, no photos or image data. Fonts must be fully embedded. InDesign does this for you automatically during export.

Step 11: Exporting the reproducible PDF
In InDesign, go to "File" and "Export". Choose your destination folder, assign a file name and set the format to "Adobe PDF (Print)". In the dialog box, you specify the following settings:
As the standard, choose PDF/X-1a:2003. Set the compatibility to Acrobat 4 (PDF 1.3). In the "Compression" section, the resolutions for color and grayscale images remain at 300 and 450 ppi respectively. Under "Marks and Bleeds", you adopt the document's bleed settings. Under "Output", you convert to the destination profile and keep the values. Choose ISO Coated v2 300% as the profile, and under "Advanced" choose the option to fully embed fonts (100%). When reducing high resolution, you ignore the warnings. Then click "Export".
The result is a reproducible PDF. At first glance it may look unremarkable, but it is exactly what the print job needs.

Step 12: Upload the file to the provider
On the provider's website, you start the order by adopting the dimensions, since the format is already fixed. Select the material. In the example, the choice falls on powder-coated sheet metal with a thickness of 0.5 mm in black. For the calendar insert, you choose anthracite and order it for two years. This is practical, as you receive two consecutive calendar blocks and can use the desk calendar for longer.
You adopt the header and footer design just as you created it. You choose the quantity according to your needs. Then you start the upload. Drag and drop the PDF into the preview. There you can see your design as it will look later.

Step 13: Check the project and use the data check
After the upload, you can save your project and share it as a link with your client. That way, they can see for themselves what the calendar will look like later. The front and back can be flipped in the preview.
Also run the data check. The professional data check examines your file for technical errors. If a green checkmark appears, the file is reproducible and you can be sure that your project contains no critical problems. Only then do you put the calendar in the shopping cart and proceed to checkout. There you can enter cost centers, references, or voucher codes before submitting the order.

Step 14: The unboxing and checking the result
After delivery, you first open the outer packaging. Each calendar comes individually in a flat box that is well suited as a gift. Take out the calendar and check the surface. In the video, a matte black with a high-quality feel is shown. Hold the calendar up to the light to judge how elegant the surface looks.
Next, insert the calendar insert magnetically into the cut-out. Make sure it sits straight. With the small ring, which can be placed on a specific day, you mark important appointments. To set it up, you bend the stand along the die-cut shape. The predefined shape makes bending considerably easier, so you hardly have to use any force. Afterwards, the calendar stands stably on the table.

Step 15: Replacing the calendar insert
A big advantage of the system: You can replace the calendar insert and reuse the desk calendar multiple times. A calendar block contains twelve months plus the last month of the previous year. This way, the calendar remains usefully usable both at the beginning of the year and during the transition. The metal frame is retained, and you only replace the block.

Summary ??? Designing and printing a metal desk calendar in InDesign: step-by-step guide
You have now learned the complete process: from downloading the template and designing in InDesign to the reproducible PDF and the order. Use the provider's template, stick to the design areas, and work exclusively with vectors. Design simply and clearly, export to PDF/X-1a with embedded fonts, and run the data check before you order. Finally, the unboxing shows how high-quality your calendar looks in the end.
FAQ
Can I use photos in the desk calendar?No, only vector graphics are permitted for this product. Logos and text must be converted to paths.
Which InDesign file should I download?The IDML file is backward compatible and works with older versions. The INDD file is the current format for newer InDesign versions.
Do fonts have to be embedded in the PDF file?Yes, the fonts should be fully embedded. InDesign does this automatically during export if you choose the right settings.
Can my design extend to the edge?No, design elements must lie within the design areas at the head and foot. Bleed is not possible.
What does the green checkmark in the data check mean?The green checkmark shows that your file is reproducible and contains no critical errors.
Can I replace the calendar insert later?Yes, the calendar insert is magnetic and can be replaced. This way, you can use the metal frame over several years.
