

If you work with sculpting in CINEMA 4D, sooner or later you will notice that the effect of a brush is not equally strong everywhere. This is exactly where falloff comes in. It determines how strongly a brush stroke acts in the center and how it fades out toward the edges. You don't necessarily have to touch it, because the default setting works well in most cases. But as soon as you need sharper edges, flatter impressions, or a different gradient, it is worth taking a closer look at this tool. In this tutorial, I will show you how the falloff is structured, how you change it, and what you should pay attention to.
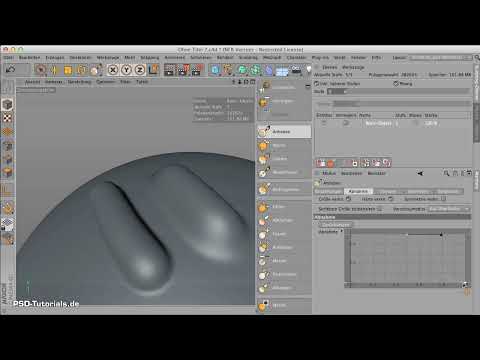
The video is only loaded from YouTube when you play it – data (including your IP address) is then transmitted to YouTube/Google. More in the privacy policy
Key Takeaways
- The falloff describes the profile of your brush tip: the center acts strongly, the edges more weakly.
- The profile can be changed via a curve, without you having to change anything about the basic shape of the brush.
- A harder brush tip produces sharper edges, but requires more polygons and careful work.
- With the Smooth tool, you can soften hard transitions afterwards.
- With the "Reset" button, you can return to the default profile at any time.
Understanding the shape of the brush tip
First, take a close look at the tool tip. It consists of a circle containing a sine-like curve. This curve is the key to the brush's behavior. Its highest point in the center stands for the strongest effect, while the curve drops off toward the edges and the effect becomes weaker and weaker.
A quick test shows the difference clearly. Paint over your object with the brush and observe how the material is displaced much more strongly in the center than at the edges. The saddle on the back of the brush is therefore the most active area. Then reduce the brush size a little, and you will see the effect even better.


Making the falloff visible on the object
To truly understand the falloff, it helps to imagine a cross-section through your brush tip. If you mentally cut it through the middle, you will see a distinct bump. This bump is exactly the falloff. It determines how strongly the brush works along its radius.
This falloff can be edited like a curve. This is deliberately solved this way in CINEMA 4D, since many settings in sculpting work via curves. With the falloff you are not completely free, but you can adjust the profile so that you can work harder in a targeted way.

Sharpening the profile
Now it gets practical. The curve profile of the falloff corresponds, in effect, to half the shape of your tool tip. If you flatten the upper area of the curve, the brush tip becomes more even at this point and the effect in the center becomes broader. The brush then works less softly and more like a stamp.
To do this, drag the top point of the curve downward. The tool tip adapts immediately, so you see the result directly in the viewport. Test the change on a simple object before continuing to work on a complex model. You will quickly notice that the tip is significantly flatter at the top than at the sides.


Sharpening the brush tip even further
If the change so far isn't enough for you, you can pull the curve further toward the edges. This creates an even harder brush tip with a very flat center area and a steeper drop-off toward the sides. You can also move the curve a bit closer to the edge so that the transition becomes even more angular.
However, pay attention to the consequences. A shape this hard rises very steeply at the sides. This quickly causes problems when working, because the material shifts unevenly at these points. With a soft, slow, and careful way of working, you stay much better in control.


Smoothing hard edges afterwards
If hard transitions appear that you don't like, you don't have to start over. With the Smooth tool, you can selectively soften the edges. Select the tool and run it over the affected areas. However, the brush tip also loses some of its typical flat character in the process, since smoothing takes away some of its sharpness again.
Smoothing is therefore a compromise. Use it selectively and not on every stroke, so that your desired effect is preserved.

Resetting to the default profile
In most cases, you won't need the falloff at all. The classic, i.e. the default profile of the brush tip, already delivers a good result and is ready to use more quickly. If you notice that your changes no longer fit or you simply want to start over, click "Reset". The original profile is then immediately active again.

When the falloff is really useful
The falloff is especially worthwhile when you want to create sharp, angular shapes. The polygon count plays an important role here. If your model has enough polygons, no jagged edges appear, and you can change the brush tip more drastically. With few polygons, on the other hand, hard profiles quickly become messy. Therefore, check beforehand whether your topology allows the desired sharpness at all.
Summary – Falloff in CINEMA 4D Sculpting: Modifying the brush tip in a targeted way
The falloff is the tool with which you control the profile of your brush tip. The center acts strongly, the edges more weakly, and you can adjust exactly this behavior via a curve. If you sharpen the profile, you work harder and achieve sharper edges, but you must make sure to have a sufficient polygon count and a gentle approach. With the Smooth tool you soften unwanted transitions, and with "Reset" you can return to the default profile at any time. For most projects the classic is enough, but the falloff remains a valuable tool for special cases.
FAQ
What is the falloff of the brush tip in CINEMA 4D?The falloff determines how strongly the brush tip acts in the center and how the effect changes toward the edges.
Do I always have to change the falloff?No. In most cases the default setting is sufficient and delivers a good result.
When should I adjust the falloff?You should adjust it when you need sharper edges, a harder transition, or a different brush tip profile.
How do I change the falloff?You edit the falloff curve. By flattening the upper area, the brush tip becomes more even and harder in the center.
What happens if I make the brush tip too hard?The brush rises very steeply at the sides and displaces the material unevenly. This leads to problems more quickly and requires more careful work.
How can I smooth hard edges again?With the Smooth tool, you run over the affected areas. However, part of the flat, typical shape of the brush tip is lost in the process.
How do I reset the falloff to the default?You click on "Reset". After that, the original profile of the brush tip is active again.
Why do jagged edges appear with hard profiles?This happens when the model has too few polygons. With enough polygons, the edges stay clean.

