

Smooth color transitions are part of almost every graphic project: they make flat shapes look three-dimensional, add light and shadow, and make motifs more vivid. This is exactly what the Gradient tool and the associated Gradient panel in Adobe Illustrator are for. In this tutorial, you will learn step by step how to create gradients, define their type and direction, adjust colors and transparency, and finally build a sphere with a shadow. I will also show you how to save your own gradient so that you can reuse it at any time.
The video is only loaded from YouTube when you play it – data (including your IP address) is then transmitted to YouTube/Google. More in the privacy policy
Key Takeaways
Key Takeaways
- You can find the Gradient panel under Window, in the entry Gradient. This is where you control all the settings.
- A new gradient always starts as a black-and-white default gradient and can be created as linear or radial.
- The gradient sliders determine color and position. You add additional color stops by clicking below the gradient bar.
- With the Gradient tool in the toolbar, you move the gradient direction and anchor points directly on the object.
- You create transparent transitions via the opacity of a color stop.
- You save your own gradients as a new swatch, and Illustrator automatically applies them when you create further objects.
Step-by-Step Guide
Step 1: Open the Gradient Panel
Before you get started, you need the Gradient panel. If it isn't visible, open it via the Window menu and select the entry Gradient. You can find the Gradient tool itself in the toolbar. Both elements work closely together: the panel shows you the settings, while the tool lets you work directly on the object.

Step 2: Create the First Gradient
Draw a circle, select it with the Selection tool, and then click the gradient fill in the Gradient panel. Illustrator immediately creates a default gradient that runs from left to right and is initially black and white. You build all further adjustments on this basis.

Step 3: Define Gradient Type and Angle
In the Gradient panel, you first choose the gradient type. You can choose between linear and radial. To start, it's best to stick with linear. Below it is the field for the angle. You can set the value via the dropdown menu or enter a number directly. The gradient then rotates by exactly that angle, so you can determine the direction precisely.
Step 4: Reverse the Gradient
If you want black at the bottom and white at the top, you don't have to rebuild the gradient. Simply click the Reverse button in the Gradient panel. The entire gradient is then mirrored, and the colors swap positions.

Step 5: Move the Gradient Sliders
Below the gradient bar are the sliders. They determine where a color transition begins and ends. If you drag the black slider far to the right, a much harder edge forms between the colors. You can also move the middle slider. If you set it, for example, so that only a small area shows black, the rest of the gradient then fades out toward white.

Step 6: Add Color Stops and Change Colors
You are not limited to two colors. Click below the gradient bar to set an additional color stop. Illustrator calculates a fitting color for this new stop, which is why you often see no difference at first. With a double-click on the field, you open the color picker and can change the color. The changes are immediately visible in the gradient.
By default, you work in the CMYK color space. However, via the small arrow icon in the panel, you can switch to RGB mode and set your colors there. You also don't necessarily have to work with the sliders. In the lower area of the color picker, you can see the complete color spectrum, from which you can select a color directly. Alternatively, you can fall back on the familiar swatches.

Step 7: Fine-Tuning Transparency and Position
A gradient doesn't have to be fully opaque. Select a color stop and set its opacity to 0 percent. The corresponding area then becomes transparent, and the gradient fades out smoothly. You can either move the position of a stop with the mouse or enter it precisely as a percentage. If you set a slider to 50 percent, for example, the transition between two colors lies exactly in the middle.
If you no longer need a slider, simply grab it and drag it out of the bar. It then disappears. To return to the default gradient, set the opacity back to 100 percent and the gradient angle to 0 degrees.

Step 8: Working Directly on the Object with the Gradient Tool
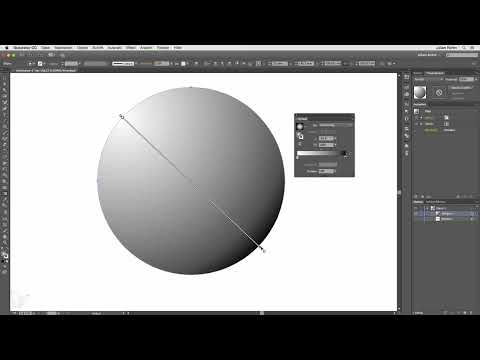
Now it gets more illustrative. Select the Gradient Tool in the toolbar and click on your circle. Handles appear on the object, which you can use to edit the gradient directly. If you move a handle, the slider in the Gradient panel adjusts automatically. The reverse works just as well.
To simulate a sphere, you drag the gradient out in a circular fashion. To do this, click on a point in the object, hold down the mouse button, and drag in the desired direction. If you drag from the top left to the bottom right, for example, a very smooth transition from white to black is created. If you also add a suitable shadow, the object already looks like a sphere.

Step 9: Coloring the Sphere
The sphere doesn't have to stay black and white. Select the object again and open the gradient by double-clicking on the gradient fill. Set the color mode to CMYK or RGB and add more stops if needed. Then color the white area with around 40 percent cyan, and the black area with around 40 percent cyan as well as a reduced brightness of about 70 percent black. The result is a blue sphere that looks more three-dimensional than any single-color fill.

Step 10: Using Preset Gradients
You don't have to build every gradient yourself. Via the small arrow in the Gradient panel, you'll find preset gradients. First select the sphere and then click on one of the gradients, for example the orange-yellow gradient. Illustrator applies it immediately. The sliders and colors can then be moved and adjusted as usual. This saves you time and you still have full control.

Step 11: Saving Your Own Gradient
If you like a gradient you built yourself, it's worth saving it. Select the blue sphere and go to the fill colors in the toolbar or panel. There you create a new entry using the New Swatch command. In the dialog, you assign a name, for example My Blue Gradient, and confirm with OK. The gradient is now available in your Swatches panel.

Step 12: Creating Another Sphere with a Shadow
When you draw a new ellipse with the Ellipse Tool, Illustrator automatically applies the most recently saved gradient. For a realistic shadow, you draw another ellipse that roughly matches the size of the sphere and color it black. Then you move it to the back in the Layers panel so that it lies beneath the sphere.
The last step is the blur. Select the black ellipse, go to Effect, then Blur filters, and there choose Gaussian Blur. Confirm the settings with OK. The shadow is now done, and your sphere looks three-dimensional.

Summary ??? Designing Gradients in Illustrator: The Gradient Tool Step by Step
Gradients are far more than a gimmick. With the Gradient panel and the Gradient Tool, you control type, direction, colors, position, and transparency exactly as your project requires. You start with the default gradient, adjust the angle and sliders, add your own color stops, and then work directly on the object. With saved swatches, you make your favorite gradients available at any time. It's best to practice with simple circles first before designing complex motifs. That way you quickly understand how each change affects the overall picture.
FAQ
How do I open the Gradient panel in Illustrator?You open it via the Window menu and select the Gradient entry there.
What types of gradients are there?You can choose between linear and circular gradients.
How do I remove a color stop?Grab the slider and drag it out of the gradient bar, and it disappears.
Can I make a gradient transparent?Yes, set the opacity of a color stop to 0 percent, and that area becomes see-through.
How do I save my own gradient?Select the object, open the fill colors, and create an entry via New Swatch, which you then name.
How do I create a shadow for a sphere?Draw a black ellipse, move it to the back in the Layers panel, and then apply the Gaussian Blur.

