
A busy harbor suddenly looks like a model-building set in which tiny little ships glide across a pond. This is exactly the effect you create with the tilt-shift look. With just a few steps in After Effects, you can also add artificial rain and snow and give your footage the charm of an old film.
The video is only loaded from YouTube when you play it – data (including your IP address) is then transmitted to YouTube/Google. More in the privacy policy
This guide summarizes the first part of a video series in which the most popular video effects are covered together. The menus and effect names come from older versions (from CS5.5). In newer versions, some effects have slightly different names, but the procedure remains the same. The timestamps refer to the points in the original video so you can follow the steps there.
Key Takeaways
- The tilt-shift effect is based on partial blur and strongly saturated coloring. A subject shot from above works particularly well.
- The Camera Lens Blur in combination with a blur map controls which areas become blurred.
- A shape layer is more practical for gradients than a solid, since it can be edited directly in the context of the effect and the map works reliably.
- With the CC Rain effect you create rain, with CC Snow you create snow. Both can be adjusted in color to match the mood using curves.
- An old-movie look is created from a film template, blend modes, reduced contrast, and an animated brightness that flickers via an expression.
Step-by-Step Guide
Step 1: Understanding the Idea of the Tilt-Shift Effect
Before you touch any sliders, you should know what defines the effect. The tilt-shift look is based on two basic building blocks: a partial blur and an exaggerated coloring. Only a small area remains sharp, while everything above and below it is softened. As a result, a real scene looks like a miniature model. Shots from a bird's-eye view work especially well, because the blur there is distributed from front to back in a physically believable way. With a horizon shot that includes sky, on the other hand, it makes little sense.

Step 2: Selecting and Trimming Suitable Footage
In the example, a clip from a bird's-eye view is used, which comes from another filmmaker. You can find the source credit in the video description. With your own footage, make sure the subject is well suited to a narrow zone of sharpness. In the tutorial, only the rear part of the clip is used, in which the sun breaks through. This fits better with the glaring, saturated look of the tilt-shift style. Trim the clip in the workspace accordingly so that only the desired passage remains.

Step 3: Applying the Camera Lens Blur
Apply the Camera Lens Blur effect to your layer. In older versions it went by names such as Blur or Reduce Depth of Field. Since CS5.5 it has been reworked and delivers faster and nicer results. With the Blur Radius parameter you set the strength of the blur. For the iris shape, the hexagon is recommended, as it offers a good compromise between quality and render time. The triangle is faster but looks less attractive, and the decagon looks the best but takes the longest. The roundness of the iris mainly affects bright points of light and is not decisive for this look.

Step 4: Creating the Blur Map with a Shape Layer
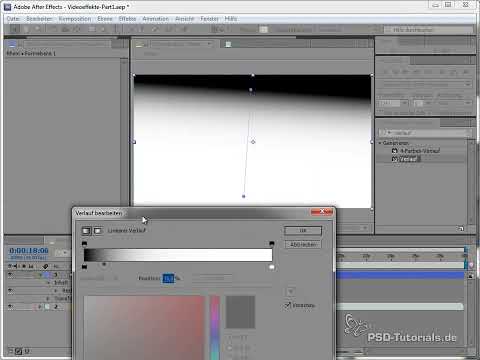
The blur requires a map, that is, a gradient that determines where blurring is applied and where it is not. A black solid with a gradient seems obvious, but it does not work reliably. The blur reads only the layer, without the effects applied to it. A precomp would therefore be necessary, which makes editing unnecessarily cumbersome. Instead, create a shape layer and apply a linear black-and-white gradient to it. Black means full blur, white means no blur. Using the gradient's handle points you define the transition and then select the layer as the blur map.

Step 5: Converting the Gradient into a Radial Spot
A linear gradient distributes the blur across the entire upper or lower half. For the tilt-shift effect, however, you only need one sharp point, such as a building or a cathedral. Therefore, switch to the radial gradient. The center point then sits on the subject, and the end point determines the extent of the sharp zone. Then you reduce the blur strength to a moderate value, around 15 to 16 pixels, so that the blur does not turn into an indistinct mush. The area around the point remains sharp, while the rest looks like a model seen from a distance.

Step 6: Building a Color Look with Curves
In the next step, the footage gets its typical look. Curves are among the most important color correction tools in After Effects. The midpoint of the curve represents the midtones, the lower left corner the shadows, and the upper right corner the highlights. To add contrast, you pull an S-curve: the highlights are raised, the shadows are darkened. This is more precise than the brightness and contrast filter. After that, you can edit the individual color channels. In the tutorial, some red is removed from the shadows and the trees are made greener, while the highlights keep their red. This creates a slight cross-process look that makes the colors appear more vivid.

Step 7: Adding a Vignette with the Circle Effect
A vignette darkens the corners of the image and draws the eye to the center. Instead of creating a new layer, you can use the Generate > Circle effect for this and apply it directly to the existing layer. Set the circle so that it stays in the center, and invert it so that the edges are filled. You increase the radius until only a narrow edge area remains. Then you set the blending mode to Multiply, choose an orange-brown color, and apply a soft edge. The opacity should only be set slightly, so that the edges do not look like an obvious mask.

Step 8: Creating Rain with the CC Rain Effect
For artificial rain, you create a new black solid at the composition size and apply the CC Rain effect to it. It produces streaks instead of individual particles and is therefore ideal for simple rain scenes. In the menu, you set the Amount, which determines the density of the rain. The streak length adjusts automatically. The angle should not be too slanted, so that the rain falls naturally from above. The Variation ensures that not all drops run exactly parallel. With the Source Depth, you determine how many drops are visible in front of and behind a foreground object. For a shot in which all the rain should be visible, you leave the value at 100 percent.

Step 9: Adjusting the Color of the Rain Look
A pure rain effect doesn't yet look like rain. To fix this, apply Curves to the layer again and pull the brightest areas down so that the scene looks darker and more oppressive. You lower the shadows as well. In the blue channel, you can create a blue tint by slightly reducing green and red, since blue is then not brightened unnecessarily. Afterwards, you desaturate the image with the Tint effect. It offers only a single slider for saturation and is therefore particularly easy to use. The scene now clearly looks like a storm and stands out from the tilt-shift part.

Step 10: Adding Snow with the CC Snow Effect
For snow, you duplicate the rain composition and replace the CC Rain effect with CC Snow. The settings are similar to those of the rain, so you will find your way around quickly. To achieve a wintry look, you brighten the footage, since winter scenes usually have less deep shadows. In the blue, you use the color effect in a noticeably cool way, without overdoing it. You should increase the Flake Size slightly so that the flakes are also visible in the finished video. An additional brightening via the curves rounds off the image.

Step 11: Covering Roofs in Snow with the Paint Tool
With the Paint tool, you can add snow to individual areas in a targeted way. To do this, duplicate the layer and open it in the Layer view so that you can paint with the Brush tool. You set the duration of the paint strokes so that they persist over the entire video and not just on a single frame. Painting is much easier with a graphics tablet, but usable results can also be achieved with a mouse. For the roofs, a rough brush stroke in white is enough, which then looks soft.

Step 12: Freezing a City with an Alpha Matte
If entire buildings are to be frozen, you need a mask that defines the area. To do this, paint on the desired buildings with the Paint tool and activate the option for transparency so that only the painted area remains. Then place an adjustment layer above it that affects only the marked area. You convert the layer into an alpha matte. With this technique, you invert the colors, brighten the footage strongly, remove green and red, and add blue. With a Tritone via the color correction, you then create a light, slightly bluish tone. If you combine the result with the snow effect, the impression of a completely frozen city is created.

As soon as there are moving objects or a bright sky in the image, the mask has to be adjusted frame by frame. For strongly moving subjects, it is therefore often worthwhile to prepare it in a painting program like Photoshop.
Step 13: Building the Old-Movie Look with a Film Template
For the old film, you use a film template with real scratches, spots, and camera shake. Such templates are offered by various providers, either free of charge or for a fee. Pay attention to the license before using them in your project. Place the template over your footage and choose a suitable blend mode. In the tutorial, the Hard Light mode gives the nicest look, but depending on the lighting situation of your footage, you can also try other modes. Blend modes can be quickly cycled through with Shift and Plus or Minus.

Step 14: Reducing Contrast and Aging the Film
An old film usually looks flatter. To achieve this, apply an inverted S-curve to your footage that lowers the bright areas and raises the dark ones. This reduces the contrast. Afterwards, you largely desaturate the colors. With the Tint effect, you can reduce the saturation again and give the whole thing a sepia character. To brighten the image additionally, you place another curves layer on top that raises the contrast somewhat again. This way, the template adapts better to the original footage.

Step 15: Animating the Flicker Using an Expression
An irregular flickering of brightness is typical of old films. You achieve this by duplicating a curves layer and raising the midtones as well as the red channel. You blend this layer in with the opacity. The trick: instead of animating the opacity, you set two keyframes on the curves value, one at the beginning and one after one second. Then create a slider for the value Bloom, ranging from 0 to 100. With the expression value at time, you link the curve values to the slider. A wiggle with five oscillations per second and an amplitude of 50 produces random swings. Negative values are not displayed, which makes the flicker only occasionally visible.

Step 16: Checking the Result
Finally, start a RAM preview to check the interplay of all layers. Pay attention to whether the flicker looks believable and whether the film look is coherent overall. If you want to change fine details, you can readjust each step individually. The part on the Matrix effect and the day-night look is covered in the second part of the series.

Summary ??? Tilt-Shift Effect in After Effects: Creating Rain, Snow, and Old-Movie Look
With the Camera Lens Blur, a shape layer as a matrix, and purposefully applied curves, you create the miniature look of the tilt-shift effect. The CC Rain and CC Snow effects deliver quick results for weather moods, which you can refine with color correction and the paint tool. An old-movie look is created from a film template, reduced contrast, desaturation, and an animated flicker. If you carry out the steps in this order, you get a result that can be reused in any project.
FAQ
Do I absolutely have to use a bird's-eye view for the tilt-shift effect?Not necessarily, but shots from above look the most believable because the blur there naturally runs from front to back.
Why doesn't my black solid work as a blur matrix?The blur only reads the layer without applied effects. A shape layer with a gradient avoids this problem, since it can be used directly.
Which iris shape should I choose for the Camera Lens Blur?The hexagon offers a good compromise between quality and render time. The decagon looks the nicest but takes the longest.
Can I also use CC Rain for rain with a sense of depth?Yes, via the Source Depth you can stagger rain in front of and behind foreground objects. For simple rain in front of the camera, however, the default value of 100 percent is sufficient.
How do I achieve a wintry color look for snow?Lighten the footage slightly, emphasize the blue, and reduce the green in the shadows. Make sure the image doesn't look too blue.
What is the alpha matte used for when icing over a city?It limits the color correction to the painted area, so that only the desired buildings are iced over.
Where can I get a suitable film template for the old-movie look?There are various providers with free or paid templates. Always check the license terms before using them.
How do I create the flicker without a keyframe for every second?Set two keyframes on the curves layer, link the value to a slider via an expression, and add a wiggle.


