
Prebuilt templates save you a lot of time, especially when you want to get to a usable result quickly. That is exactly what this tutorial is about. You will learn how to not only run the Blog Post Writer in Google Opal, but also adopt it as your own workflow, rename it, extend it, and add an email step. Opal assembles AI-powered workflows from individual building blocks. A template is an ideal starting point because the connections between the steps are already in place. You just need to know which levers you can adjust.
The video is only loaded from YouTube when you play it – data (including your IP address) is then transmitted to YouTube/Google. More in the privacy policy
Key Takeaways
- Prebuilt templates are read-only and cannot be edited directly.
- Via the remix link, you create your own editable copy of the workflow.
- You can rename the workflow, add additional inputs, and insert new steps.
- A preview with a test run shows you whether the process works before you use it regularly.
- An email notification can be added with an additional step and a suitable prompt.
Step-by-Step Guide
Step 1: Open the template and recognize its limitations
Open the desired template from the template overview and click on it. You will now see the complete workflow. You can view it in the preview, start it, and switch between the app and the editor. However, if you try to change the name, enter your own prompt, or move individual building blocks, you will notice that this is not possible. The reason is simple: templates are fixed. They are meant to serve as templates that can be used again and again, and that is why Opal prevents direct changes. Keep this behavior in mind, because it determines the next step.

Step 2: Create an editable copy via remix
To customize the template anyway, hover your mouse over the workflow. A remix link will then appear. Click on it. The workflow editor opens and from now on you are working with your own copy. The original remains unchanged, so you can experiment safely.

Step 3: Rename the workflow
In the editor, at the top you will find the option to give the workflow a new name. Choose a name that clearly describes your purpose, for example "My Blog Workflow". A clear name will help you later when you run several workflows in parallel and want to quickly find the right one.

Step 4: Add inputs and building blocks
Now it gets interesting. In the editor, you can add further inputs, insert additional AI generation steps, or place output blocks. Branches and multiple conditions are also possible. You don't have to rebuild everything right away. It is enough to extend the workflow at one point and then test the effect.

Step 5: Test the workflow in the preview
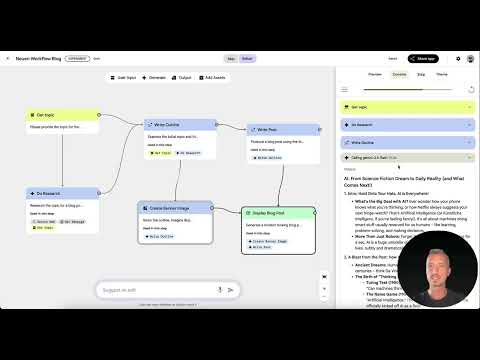
Click on "Preview" and start a new run. In the input field for the topic, enter for example "artificial intelligence" and start the workflow. At the bottom of the window you can see the progress. First the "Do research" step runs, followed by the outline. The console shows you at any time which step the workflow is in and which model is currently being addressed, such as Gemini 2.5. This way you can immediately tell whether a step is stuck or errors are occurring.

Step 6: Check the result and reuse it
After a few minutes, the workflow creates a banner with a title, then a matching image, and combines everything into a finished blog post. In the example, a detailed text with many paragraphs was produced. You can use it directly as a basis for your own blog. Note that the output is in English by default, because Opal has so far only been released in the USA. If you want German, simply add the instruction to write the text in German to the prompt. Since Opal is still in the beta phase, execution may also take a bit longer.

Step 7: Automate the workflow with a trigger or loop
If you need not just one but many articles, you can have the workflow run repeatedly via a trigger or loop. This way, you can create 10, 20 or even 100 posts with little effort. According to the speaker, usage is free during the current beta phase. Still, check the current terms of use, as they may change.

Step 8: Add an email notification
Finally, you extend the workflow with a step that informs you as soon as a new post is finished. To do this, write a prompt along the lines of "write post" and then add a step with the instruction "generate email notification". Thanks to the branching, you can attach this step directly to the existing flow without rebuilding the rest of the workflow. Then test the extension as in Step 5 and check whether the email arrives as desired.

Summary – Google Opal: Using, customizing and extending blog templates
Templates are the fastest way to a working AI workflow, but they are initially read-only. Via the Remix link, you create your own copy, which you can rename, add inputs to, and extend with steps such as an email notification. With the preview, you test each change before letting the workflow run automatically. With this approach, you get an individual blog workflow that is tailored to your needs.
FAQ
Why can't I edit an Opal template directly?Templates are intended as fixed blueprints that can be used again and again, so they are read-only and can only be changed via a copy.
How do I create an editable copy of a template?Hover the mouse over the workflow, click the Remix link that appears, and then edit the new copy in the workflow editor.
Can I change the name of my workflow?Yes, after the remix you can assign your own name at the top of the editor that clearly describes your purpose.
How do I test a workflow before using it in production?Use the "Preview" function, enter a topic, and start the run. In the console, you will then see each individual step.
In which language does Opal create the blog posts?By default in English, since Opal has so far only been released in the USA. However, you can request in the prompt that the text be written in German.
How do I have multiple blog posts created automatically?Set the workflow to a trigger or loop, and it will be executed repeatedly and create the desired number of posts.
How do I get an email when a post is finished?Add an additional step with the prompt "generate email notification" to the workflow, which is executed after the post is created.

