
You have already learned what HTML is and now want to see how to apply colors and font sizes directly to individual elements? That is exactly what this tutorial is about. You will build a small HTML skeleton, add the head section and the character set, and then learn how the style attribute works. By the end, you will know how CSS instructions can be written directly in the HTML document and why you should only use this method selectively.
The video is only loaded from YouTube when you play it – data (including your IP address) is then transmitted to YouTube/Google. More in the privacy policy
Key Takeaways
Inline styles are placed directly on the HTML element via the style attribute. You separate multiple CSS instructions with semicolons. However, they are not intended for the entire styling of a page, but only for specific exceptions.
Step-by-Step Guide
Step 1: Create the HTML Skeleton
Start with an empty document and build the basic structure. All the content of your page will later be placed inside the html tag. This element is therefore the foundation of every HTML document.

Step 2: Understand the Head and Body Sections
Inside the html tag, you will essentially find two sections. The head contains invisible information such as the page title or the description for search engines. The body, on the other hand, is the actual document body, in which you place all visible elements such as paragraphs, headings, or images.
Step 3: Set the Page Title in the Head
Now add the title of the page in the head. It does not appear within the web page itself, but in the title bar or the tab of your browser. So write the title in such a way that you can immediately recognize it there later.
Step 4: Define the Character Set with UTF-8
Add a meta tag with the attribute charset in the head. Specify the value UTF-8 there. This defines that your document uses Unicode, and you can display special characters such as umlauts without any problems.
Step 5: Test the Effect of the Character Set
Deliberately remove the charset tag once and reload the page in the browser. You will notice that umlauts are displayed incorrectly. The reason is that, without being told otherwise, the browser assumes a different character set. Then put the tag back in, reload, and check that the problem is fixed. You should definitely try this test yourself, because that is how you understand the importance of this line.

Step 6: Create a Paragraph in the Body
In the body, you now write a text and wrap it in the p tag, i.e. the paragraph. This element marks the content as a coherent section of text. This semantic markup is important for search engines and assistive tools, even if you don't yet see a visual difference with just one paragraph.
Step 7: Use the Style Attribute on the Element
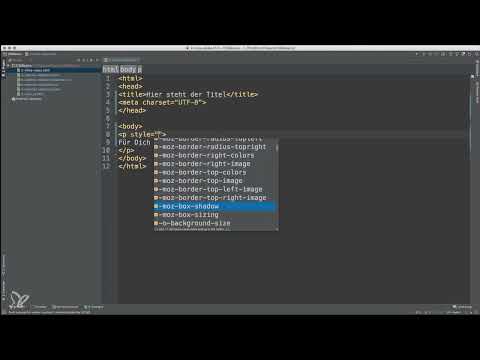
Now comes the actual core. Every HTML element has the attribute style. There you can enter CSS instructions directly. The editor suggests available CSS properties as you type. For a clearly visible change, first choose background-color, i.e. the background color. Set it to red and reload the page. The paragraph now has exactly this one background color.

Step 8: Add More Properties
You can add further instructions in the same attribute. For example, additionally set the color to yellow. This changes the text color, not the background color. The color combination is certainly not visually pleasing, but it makes the effect of each individual instruction very clear.

Step 9: Understand the Structure of an Inline Instruction
Each instruction consists of three parts. First comes the CSS property, such as font-size. Then follows a colon, and then the desired value, for example 25px. You separate multiple instructions with a semicolon. You can omit the semicolon after the last instruction, as it is not strictly necessary in this case. However, as soon as you add another instruction, you must put the semicolon before it.

Step 10: Adjusting the Font Size
Now add the font-size property with a value of 25 pixels. Reload the page. The text becomes noticeably larger. This way, you can set multiple properties on a single element at the same time without it being a technical problem.

Step 11: Understanding the Limits of Inline Styles
Inline styles are convenient because they take effect immediately and are directly visible. However, they are poorly suited for styling an entire document. If you want to style many elements the same way, you have to repeat every instruction, and changes quickly become hard to keep track of. Therefore, use inline styles deliberately for exceptions, for example to override a single property at a specific place. For the overall design, you will learn two alternatives in the following videos.
Summary – Inline Styles in HTML: Applying CSS Directly to the Element
You have built a basic HTML skeleton with head and body and set up the UTF-8 character set. Then, using the style attribute, you wrote CSS instructions directly on a paragraph, adjusted the background color, text color, and font size, and learned the syntax consisting of property, colon, value, and semicolon. Inline styles are a quick way to make targeted individual adjustments. For a well-thought-out overall design, however, you should resort to the alternatives presented in the next video.
FAQ
What is an inline style?An inline style is a CSS instruction that is placed directly in the style attribute of an HTML element.
What is the meta tag with charset="UTF-8" used for?It specifies that the document uses Unicode so that umlauts and special characters are displayed correctly.
How do I separate multiple CSS instructions in the style attribute?You separate them with a semicolon. The last semicolon can usually be omitted.
Where does the title of a page appear?The title does not appear on the web page itself, but in the title bar or in the browser tab.
Should I use inline styles for the entire design?No, they should remain the exception. Other methods are better suited for the overall styling.


