
Imagine you run a website with ten subpages and want to change the main color. If the design rules are in the header of every HTML file, you have to make the same change ten times and risk missing a page. An external style sheet solves exactly this problem. The rules move into their own CSS file that all pages share.
The video is only loaded from YouTube when you play it – data (including your IP address) is then transmitted to YouTube/Google. More in the privacy policy
In this tutorial you will learn how to create such a file, include it cleanly, and work with multiple color schemes. The basis is the example from the video on Internal Style Sheets, which you should ideally still have open.
Key Takeaways
Key Takeaways
- External style sheets live in their own .css files and are included via a link element in the head section.
- A CSS file can be used by any number of HTML pages. You then make changes in only one place.
- The loading order determines which rule applies: rules loaded later override rules loaded earlier.
- A style block in the document overrides external files, and the style attribute on the element has the highest priority.
- Grouped selectors such as h1, p { color: orange; } avoid duplicate declarations.
Step-by-Step Guide
Basics: Why Move Styles Out?
Before you change any code, it is worth looking at the purpose. Websites often consist of several pages that share the same layout. If the styling is in each file separately, you have to adjust every instance whenever you change font size, color, or spacing. Moving styles out means writing the rules into a standalone CSS file. The HTML file then contains only content and a reference to the style sheet. Content management systems such as WordPress work on exactly this principle.

Preparing the Starting Point
Open the HTML file from the last video and check in the browser whether it looks as usual. Then remove the entire style block from the head section, that is, the tags <style> and </style> along with their content. Reload the page. It now looks unstyled because the rules are missing. You will fix exactly this state in the next steps.

Creating the External CSS File
In the same folder as your HTML file, create a new text file and name it externalstylesheet.css. The .css extension is crucial so that the browser recognizes the file as a style sheet. Then copy the rules from the removed style block into it, without the style tags. The CSS file now contains only the selectors with their properties, for example h1 { color: red; }.

Setting the link Element in the Head
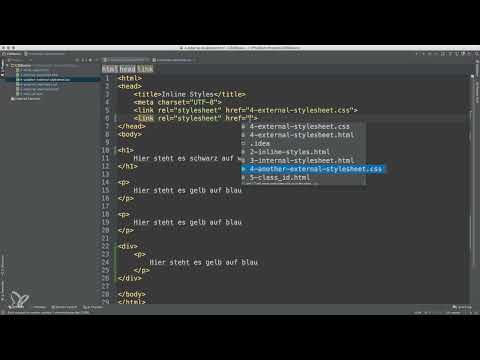
Switch back to the HTML file and add a link element in the head section. It acts as a reference and tells the browser that an additional resource should be loaded. The attribute rel="stylesheet" specifies that this resource is a style sheet.
Specifying the File Path with href
With the href attribute, you specify where the CSS file is located. If it is in the same folder, the file name is enough. The complete element looks like this:
If the file is in a subfolder, add the path accordingly, for example css/externalstylesheet.css.

Checking the Result and Recognizing the Advantage
Reload the page. The heading appears red again, and the layout matches the state before moving the styles out. The real gain lies in the structure: all rules are now in a single place. If you have more HTML pages, you include the same file there. Future color changes are made only in the CSS file.
Creating Multiple Color Schemes
Subheading: Color Schemes and Targeted Overriding
It gets exciting when visitors or editors are supposed to choose between different color schemes. For this, you create a second CSS file, such as orange.css, and include it with another link element. Make sure that each file has a unique name so that you can recognize it immediately in the code.

Overriding Selectively
In orange.css, write the rule h1 { color: orange; } and reload the page. The heading is now orange. Add p { color: orange; } so that the paragraphs also get the new color. You don't have to repeat all the rules. Only the color property is overridden, while the font size and background color are retained from the base file.

Understanding the Loading Order
The order of the link elements in the head section determines which file wins. If externalstylesheet.css comes before orange.css, the orange rule prevails. If you swap the two lines, the heading stays red, because now the file loaded last determines the color. In the browser, you can see this via the developer tools: by right-clicking the heading and choosing the command "Inspect", you will see the overridden rule struck through.
Grouping Selectors
If the same property applies to several elements, you don't have to write it anew each time. You separate the selectors with a comma: h1, p { color: orange; }. With 15 or 20 affected elements, this saves you a lot of maintenance effort. The rule also stays in one place if you want to adjust it later. Feel free to write the selectors on separate lines one below the other, so the file stays clear and organized. For the browser, it makes no difference.
Keeping Priorities Under Control
Subheading: Priorities between files, blocks, and attributes
Besides external files, a document can also bring its own rules. A style block in the HTML document takes precedence over all external files loaded before it. To do this, place a style block with the rule h1 { color: green; } below the link elements. After reloading, the heading is green. This is exactly how many content management systems work: the design team supplies the CSS files, and a color value chosen by the user is written into the page on the server side as a style block.

The style Attribute as the Highest Level
The strongest rule is the style attribute directly on the element, for example <h1 style="color: white;">. The heading then becomes invisible, with white text over the background. If you additionally add background-color: black;, it is readable again. The attribute overrides all stylesheets, so you should use it sparingly. As a rule of thumb, the order from weak to strong applies: external files in their loading order, then the style block, and finally the style attribute.

Summary – Including External Style Sheets: Properly Outsourcing CSS Files
External stylesheets separate design and content. You store the rules in a .css file and include it in any HTML page via a link element with rel and href. With multiple files, you work with color schemes whose effect depends on the loading order. Grouped selectors keep the code lean, and priorities from style blocks to the style attribute ultimately determine what is actually visible.
FAQ
Does the CSS file absolutely have to be in the same folder as the HTML file?No, you can also use a subfolder; in that case, you adjust the path in the href attribute accordingly, for example css/styles.css.
What happens if the file name in the href is misspelled?The browser does not find the file, does not load it, and the page remains without the styling from the CSS file. Check in the developer tools under the Network tab whether the file was loaded successfully.
Can I include multiple CSS files on one page?Yes, you can add as many link elements as you like. The order in the head section decides which rule wins in case of conflicts.
Should I write styles directly in the HTML element?Only in exceptional cases. The style attribute has the highest priority and makes later maintenance more difficult, because the rule is attached to each individual element.


