
Before you start designing your first content in Elementor, it is worth starting from a clean slate. A page that starts with default settings often comes with unwanted elements: a page title that appears twice, a top bar with unnecessary information, or a footer that distracts from the actual content. In this guide, you set up a test page so that the layout, title, footer, and header are prepared for designing with Elementor.
The video is only loaded from YouTube when you play it – data (including your IP address) is then transmitted to YouTube/Google. More in the privacy policy
You make the settings directly in the WordPress backend and in the theme menu of OceanWP. The prerequisite is that the OceanWP theme and the Ocean Extra plugin are already installed and activated. The steps shown take only a few minutes, but you have to repeat them for every page you create later.
Key Takeaways
- Every new page should be created with the same basic settings so that all pages look consistent.
- In the OceanWP menu, you set the content layout to 100% Full Width so that the content extends to the edges.
- Page title, footer, and top bar can be hidden on a per-page basis, so that you can design everything yourself in Elementor later.
- The header remains important for the design and should only be finally set up after creating several pages.
- Permalinks must not contain umlauts, as WordPress often causes errors with them.
Step-by-Step Guide
Step 1: Open the Pages Overview
Log in to the WordPress backend. In the left menu bar, you will find the item Pages. Click on it, then on All Pages. There you will see a list of all existing pages. If you don't have a page yet, the list is empty. That is not a problem, because in the next step you will create a new page.


Step 2: Create a New Test Page
Click on Create or Add New at the top. WordPress opens the page editor. Make sure that a name is already entered in the page title field or enter one yourself. In this example, you use the title Testseite. The title is initially just a working name; you can change it at any time later.

Step 3: Set the Page Title and Check the URL
As soon as you enter a title, WordPress automatically adjusts the permalink URL. You can see the address directly below the title field. For Testseite, for example, it is deine-domain.de/testseite. If you don't like the URL, you can change it using the edit field next to the address. You don't necessarily have to adopt the page title, but the two should fit together sensibly.

Step 4: Publish the Page
Click on the blue Publish button at the top right. WordPress asks for confirmation. Make sure that the visibility is set to Public and that the page is published immediately. Alternatively, you could also schedule it in advance. Then confirm again with Publish.
Afterwards, open the page in a new tab. This way you can see what it looks like in the frontend. You will see the page title above the content, possibly a menu, and additional information from the theme. You will turn off or adjust exactly these elements in the next steps.

Step 5: Set the Content Layout to Full Width
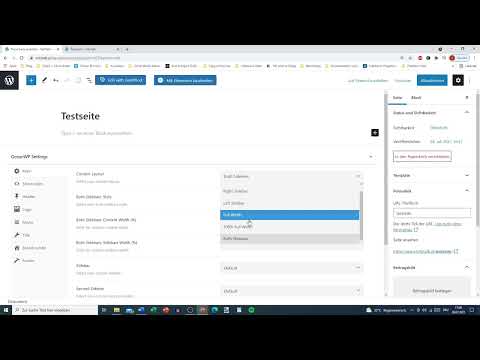
Return to the page editor and scroll below the content area to the OceanWP Settings section. In the Main tab, select the top option Content Layout. By default, it is set to Default. Change it to 100% Full Width. This way, the content uses the full width of the page and extends to the edges.
Without this setting, an unused strip often remains on the left or right. If you set the layout to Left Sidebar, for example, you will immediately see how the page changes. For preparing for Elementor, however, full width is the most sensible choice. Then click Update to save the change.

Step 6: Hide the page title
In the same settings area, you will find the item Title at the bottom left. Open it and set the option for the page title to Disable. This makes the title that would otherwise appear above the content disappear. Click Update and check the page again. The title is now no longer visible.
This step is important because you will deliberately design the heading in Elementor later. Otherwise, you would have two titles on top of each other.

Step 7: Disable the footer
The footer is the area at the bottom of the page. In the OceanWP area, open the item Footer. There you turn off both the footer widgets and the copyright area. You don't need either for the preparation. Click Update and check the page. The footer has now disappeared.
Here too: the elements are not deleted, only hidden for this page. You can turn them back on at any time.

Step 8: Remove the top bar
Above the header, depending on some settings, there is a thin line or a top bar with additional information. To hide it, open the third item Header in the OceanWP menu. There you will find the option Display Top Bar. Set it to Disable and click Update. The line should then disappear and the page content sits at the very top.

Step 9: Hide the header for now
In the same Header area, you will find the option Display Header. Set it to Disable as well and save with Update. This makes the page completely empty, as it should be when prepared for Elementor. The header will be designed later in Elementor or via the OceanWP settings, once you have created several pages.

Step 10: Transfer the settings to all other pages
You must repeat steps 1 to 9 for every page you will need later. This is important so that all pages look consistent. As a help, it is recommended to first create the home page and one or two additional pages. With several pages, you can later also design the header sensibly, for example with menu items and sub-items. With only one page, the targets for this are missing.
Tip: Do not use umlauts in permalinks
When naming the pages, make sure the URL contains no umlauts. So do not write über-mich, but ueber-mich or simply ueber-mich. WordPress often does not cope well with umlauts in permalinks, which can lead to errors. A cryptic-looking ue is unproblematic and entirely sufficient for the function.
Summary – Properly preparing Elementor pages with OceanWP
You have learned how to create a test page, set the content layout to Full Width in the OceanWP menu, and hide the page title, footer, top bar, and header for designing with Elementor. It is important that you repeat these basic settings for every page so that your site stays consistent. It is best to create the home page and one or two additional pages right away, before you design the header. Also make sure to use umlaut-free permalinks, so that managing your pages stays smooth.
FAQ
Do I have to install Ocean Extra to follow this guide?Yes, the option for title, footer, and header settings in the OceanWP menu requires the Ocean Extra plugin.
Can I show the page title again later?Yes, you can set the Title option to a different setting at any time and save with Update.
Why should I avoid umlauts in the URL?WordPress does not always process umlauts in permalinks reliably, which can lead to errors or broken links.
Do I have to make all settings again for every page?Yes, the settings only apply to the respective page and must therefore be repeated for each new page.


