
A well-placed video can make a page more lively than any block of text. But between an embedded clip and a truly well-thought-out video section lie a few settings that are easy to overlook. In this guide, I will walk you through the Video element in Elementor step by step. You will learn which video sources are available, why you should rather not upload large files directly, how to set playback options and privacy, and how to use the lightbox to open a video in its own window.
The video is only loaded from YouTube when you play it – data (including your IP address) is then transmitted to YouTube/Google. More in the privacy policy
Key Takeaways
- The Video element can be dragged and dropped into any section.
- YouTube, Vimeo and Dailymotion are most easily embedded via the link.
- Self-hosted videos are usually not a good choice because of file size and loading time.
- It is best to upload your own videos to YouTube as "unlisted" and then embed them.
- The private mode ("privacy mode") helps you implement data protection requirements more easily.
- The lightbox, i.e. an overlay window, keeps your layout clean while the video plays inside it.
Step 1: Drag the Video element into the section
Open the page where the video should appear in the Elementor editor. Click the plus icon to add a new section, or select an existing section. Then look for the "Video" element in the Elementor widget area and simply drag it to the desired position. This element is one of the most exciting tools Elementor offers, because it combines embedding, design and interaction in a single widget.

By the way, for testing purposes Elementor has already prepared a short sample video of about 15 seconds in length. It is best to mute the sound while you work so that you are not distracted. That way you can immediately see what the result will look like on your website later.

Step 2: Define the video source
In the content settings area, you select the video source. You basically have three options. For YouTube, Vimeo and Dailymotion, it is enough to insert the link to the video. Elementor automatically recognizes the service and embeds the video correctly. This variant is the simplest and at the same time the most recommended, because your video is not stored on your own web space.

Step 3: Why you should avoid self-hosted videos
The third option is to upload a video directly into Elementor via "Choose File". I personally would not recommend this route. In many hosting environments, the maximum upload size is around 200 MB. If your videos are several gigabytes in size, you will quickly fail here. In addition, the upload takes extremely long and puts a strain on your website. So for recurring videos, this is not a viable solution.

Step 4: Upload your own videos to YouTube as "unlisted"
The better alternative for your own content is the detour via YouTube. Upload your video there and open the video editing area in YouTube Studio. Under the visibility options, choose "Unlisted". Make sure not to choose "Private", because then the video cannot be embedded. An unlisted video does not appear in your channel or in search results, but it is accessible via the link. Copy this link and paste it into Elementor. This is much easier than uploading files.

Step 5: Set start and end time
Once the link is entered, you can determine at which point the video begins and ends. The values are given in seconds. If you set the start time to second 5, for example, the video starts there and runs until the specified end time. With a short clip like the 15-second example, this makes little sense, but with longer videos you can cut off intros or idle time.
Step 6: Weigh up autoplay and mobile use
With the "Autoplay" option, the video starts as soon as the visitor scrolls to it. On desktop, this can make sense. On mobile devices, however, you should be careful, because many users have only a limited data volume. If videos suddenly start on your page while scrolling, some visitors are more likely to leave the page again. On smartphones, you are therefore better off not using autoplay.

Step 7: Setting the Sound, Loop, and Player Buttons
For videos that serve mainly visual purposes, such as a clip for a fashion collection, it makes sense to mute the sound. However, if the video contains important information or your own voice, you should leave the sound enabled.
With the "Endless Loop" option, the video is played again from the beginning over and over. This is suitable for short clips of 20 or 30 seconds, but not for a 15-minute explainer video.
With the player buttons, you determine whether the typical start button remains visible. If you remove it, the video does not start with a click, but according to your other settings.


Step 8: Activating Private Mode for Data Protection
Private mode, also called privacy mode, is an important setting that you should enable by default. This way, the video is not directly linked to YouTube. YouTube does not store any information about the visitors to your website until they actually play the video. A mere page view then does not count as a click, is not counted as a view, and no data is collected. Especially with regard to the General Data Protection Regulation, this is a significant advantage.
Step 9: Lazy Load and Suggested Videos
With the "Lazy Load" option, the video only loads when it comes into the visible area. This saves page load time, but can seem somewhat delayed on slow connections. In addition, you can specify which videos YouTube should suggest after the video ends. You can either display videos from your current channel or select any other video.

Step 10: Setting a Custom Thumbnail and Start Icon
By default, Elementor shows a snippet from the video as a preview. If you want to use your own image, such as your YouTube thumbnail, you select it via the image overlay. You can adjust the size of the image, as you already know from the image element.
A start icon in the middle immediately signals to the visitor that it is a video. Without this symbol, the image could also simply be a graphic. The icon can also be edited, which we will look at in the next step.


Step 11: Activating the Lightbox and Adjusting the Aspect Ratio
If you select the "Lightbox" option in the image overlay, the video does not open directly in your page when clicked. Instead, a darkened window appears in which the video is played. The background remains visible behind it, so the visitor keeps the context.
In the pencil icon of the lightbox, you can set the aspect ratio, for example 21:9 or 3:2. For YouTube videos in 16:9 format, however, this setting hardly matters, because the videos are displayed in this ratio anyway. CSS filters such as brightness or blur can also be adjusted. They only affect the thumbnail, not the video in its playing state.


Step 12: Designing the Start Icon
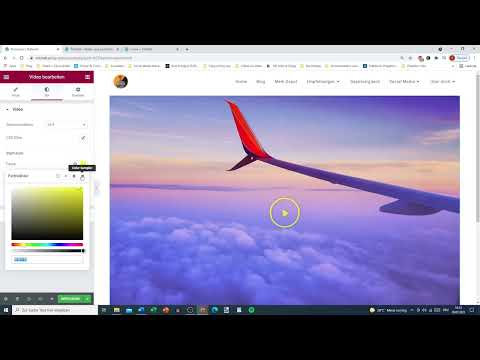
In the start icon section, you can freely choose the color. White is the default color; red or yellow often stand out more strongly on the thumbnail. You can enter a color code or use the eyedropper tool to pick a color directly from the image.
The size of the icon can also be adjusted. Feel free to try different values until the symbol is clearly recognizable without dominating the image. You can also add a shadow. This works particularly well if the thumbnail has a light or low-contrast background.

Step 13: Matching the Lightbox Colors
The lightbox itself can also be styled. You can change the background color, which is transparent black by default. A red or green surface is also possible if it fits your design.
The close icon, the X at the top right, is important. Visitors use it to close the window, or they press the Escape key. Since not everyone uses a keyboard, the X should be clearly visible. So choose a color for the X that stands out clearly from the background. You can also set a separate color for the mouse pointer, for example green when hovering over it. This lets visitors see that the element is clickable. A small color difference in the hover state provides a lot of orientation here.


Step 14: Set the content area, position and animation
In the content area of the lightbox, you define how large the video should appear in the window. With a value of around 80 or 100 percent, it remains clearly visible without completely filling the edge. You can also decide whether the video is centered or placed more toward the top or bottom. This is especially relevant if you are working with a smaller size.
The entrance animation determines how the window appears. Options include Fade-in, Zoom-in, Slide-in, Bounce, Rotate, Pulse or Roll-in. Be careful not to overdo it, because too many effects quickly look restless.


Step 15: Save the settings and check the result
When you have set everything up, click “Update” or “Save”. Then close the settings window and open the preview of your page. Click on the preview image to check whether the lightbox opens as desired, the video starts and the X appears correctly.

If you want to change something later, you open the video element via the blue pencil at the top right of the element. The other settings such as spacing, backgrounds or responsive options are the same as those of other elements, which you surely already know.

Summary – Embedding Videos in Elementor: Guide for YouTube, Lightbox and Start Icon
You have now learned all the important building blocks for embedding videos cleanly in Elementor. Drag the video element into the section, insert the link to your video, and preferably upload your own content as unlisted YouTube videos. Set playback, sound and loop to suit your content and activate private mode for better data protection. With a preview image, start icon and lightbox, you design the presentation, and with a short test before publishing, you make sure everything works smoothly.
FAQ
Can I upload videos directly in Elementor?It is possible, but not recommended for larger files, because the upload limit is often around 200 MB and the upload takes a very long time.
Why should I upload a video as “unlisted” and not as “private”?Unlisted videos can be accessed via the link and can be embedded, whereas private videos are only visible to you and therefore do not work on your website.
What does private mode do?It prevents YouTube from storing information about visitors before they actually play the video, and thus supports the requirements of the General Data Protection Regulation.
Should I let videos autoplay on smartphones?I advise against it, because many users have limited data volume and unwanted video starts quickly make the page unpleasant.
What is the lightbox?The lightbox is an overlay window that opens when you click on the video and darkens the background, so that the video plays in the foreground.
How can I make the close icon more visible?Choose a color that differs clearly from the background of the lightbox, and set an additional color for the mouse pointer so that the visitor recognizes the clickable area.


