
Turning a color photo into a black-and-white image in GIMP often takes only a few clicks. This tutorial uses a single example image to show how much the result can differ. You will learn the quickest way, plus three variants of desaturation, and finally the Channel Mixer, which gives you the most control. In the end, you can decide for yourself which method suits your subject. You perform all steps on a copy of the original layer so that your source image is preserved.
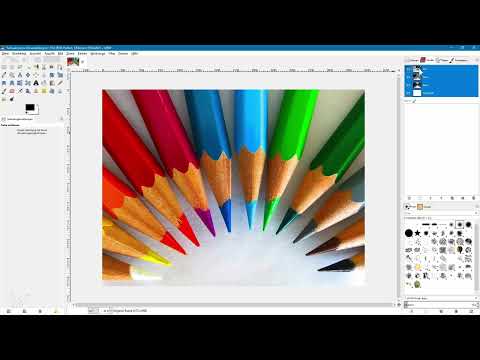
The video is only loaded from YouTube when you play it – data (including your IP address) is then transmitted to YouTube/Google. More in the privacy policy
Key Takeaways
- The command Image > Mode > Grayscale removes all color information. Re-colorizing later is only possible via workarounds.
- Work non-destructively: create a copy of the original layer and give it a meaningful name.
- Colors > Hue-Saturation and Colors > Desaturate are quick, but offer little influence over the result.
- The Channel Mixer allows the finest control because you set the proportions of red, green, and blue individually.
- The sum of the channel proportions should not exceed 100 percent, otherwise details in light or dark areas are lost.
- Which variant works best depends on the subject. In this example, the Desaturate variant Luminosity is the most convincing.
Step-by-Step Guide
Step 1: Check the Color Mode and Channels
Begin by looking at the title bar of your image. It says RGB. This means the image is made up of three color channels: red, green, and blue. You can find these channels in the Channels palette. They will be crucial later for the Channel Mixer.

Step 2: Take a Closer Look at the Red Channel
In the Channels palette, activate only the red channel. Light areas show where there is a lot of red in the image, while dark areas, such as the blue pencils in the example, contain no red. Already here you can see that each channel has its own brightness distribution. You will deliberately exploit exactly this difference later.

Step 3: The Dead End of Grayscale Mode
The most obvious way is via Image > Mode > Grayscale. The image immediately becomes black and white, but only a single gray channel remains in the Channels palette. All color information is lost, and you would have to switch the mode back first in order to work with colors again. This method is therefore not well suited for flexible editing. Undo the mode change and continue working with the color image.

Step 4: Remove Colors via Hue-Saturation
Now create a copy of the original layer and name it something like "Black-and-White Hue-Saturation". Select the copy and open Colors > Hue-Saturation. Select all color ranges and drag the Saturation slider all the way to the left. With OK, the conversion is complete. The result is produced quickly, but can hardly be influenced: you can only remove the colors from the image completely or weaken individual color ranges.

Step 5: Desaturate with the Average Variant
Create another copy of the original layer and drag it to the top. Open the Desaturate entry via Colors. Three variants are available there: Luminosity, Average, and Lightness. Start with Average and confirm with OK. For orientation, name the layer something like "Desaturate (Average)" so that you can easily compare the variants later.

Step 6: The Luminosity and Lightness Variants
Repeat the process with two more copies of the original layer. Each time, choose Colors > Desaturate and set it once to Luminosity and once to Lightness. Name these layers clearly as well. Each variant calculates the grayscale differently, which is why the results differ significantly despite the same source file.

Step 7: Compare the Three Desaturate Variants
Show and hide the layers one after another. In the example, the Lightness variant looks the flattest, because many pencils appear almost equally bright. Average already shows more contrast. Luminosity is the most interesting, because there dark, medium, and light areas clearly stand out from one another. Also note: the Lightness variant delivers the same result as Hue-Saturation. So with the Desaturate dialog you gain three variants, but not yet a fundamentally new way of controlling the result.

Step 8: Open the Channel Mixer and set it to Monochrome
For more influence, you work with the channels themselves. Create another copy of the original layer and place it at the very top. Select the copy and open Colors > Components > Channel Mixer. Enlarge the dialog box so you can better assess the preview. Then activate the Monochrome option. The preview now shows a black-and-white image that initially consists only of the red channel.

Step 9: Mix the channel proportions and observe the 100 percent limit
Now you determine how much each channel contributes to the overall image. If you pull the red proportion down, the image appears flatter. With the blue slider you can add bright areas, and with the green slider you can bring additional brightness into certain zones. The sum is important: all three values together should preferably not exceed 100 percent. Otherwise, bright areas blow out or dark areas sink into black, and detail is lost. In the example, you reduce the red proportion to 59 and then still have room to play with for the other channels.

Step 10: Enter values precisely
Instead of experimenting with the mouse, you can also enter the values directly. In the example, you set red to 59 and green to 13. That leaves 28 percent until the limit of 100, which you can use for blue, for instance. You keep entering varying values until the result suits your taste. Confirm with OK and name the layer something like "Channel Mixer".

Step 11: Compare all conversions
Show the individual layers one after another. Hue-Saturation looks rather boring and low in contrast. Average is somewhat higher in contrast. Luminosity convinces with a harmonious ratio of light and dark. The Lightness variant falls short again. In a direct comparison, the Channel Mixer cannot automatically be declared the winner. With more time, you could still adjust its values so that it matches Luminosity, because it offers the greatest freedom for this.

Step 12: Draw your personal conclusion
In the example, the Desaturate variant with Luminosity is the personal favorite, because the brightness levels are distributed most beautifully. However, your own judgment is what matters. The Desaturate variants are suitable for quick results, while the Channel Mixer gives you the greatest creative freedom, provided you take your time. Try both approaches on your own photos and keep the layers well named so that you can return at any time.

Summary ??? Black-and-white conversion in GIMP: Four ways compared
In GIMP, you have learned four ways to convert a color image to black and white. Grayscale mode is the fastest way, but it takes away any later possibility of bringing colors back. Hue-Saturation and the three Desaturate variants Average, Luminosity and Lightness deliver usable results in a short time, but can only be controlled to a limited extent. The Channel Mixer offers the greatest control, but requires patience and adherence to the 100 percent limit. Always work on copies of the original layer, then each variant remains comparable and reversible.
FAQ
Why shouldn't I use Grayscale mode first?Grayscale mode removes all color information, so colorizing later is only possible through detours.
What distinguishes the Luminosity, Average and Lightness variants when desaturating?Each variant calculates the grayscale differently, which is why contrast and brightness distribution in the result can differ significantly.
How do I avoid losing details with the Channel Mixer?Make sure that the sum of the channel proportions preferably does not exceed 100 percent, otherwise bright areas blow out or dark areas lose their detail.
Why should I work with a copy of the original layer?The original layer remains unchanged, so you can return to the original image at any time and compare different variants safely.
Which method is best suited for quick results?The Desaturate function with its three variants is quick to apply and usually delivers usable black-and-white images right away.


