
A photo with a blurry, single-color background can be cut out in just a few minutes. It only gets difficult when fine hair, contrasts, or light fringes come into play. That is exactly what this tutorial is for: You will learn how to prepare a high-contrast mask with the Channel Mixer, refine it with tools such as Dodge, Path, and Brush, and finally separate it cleanly from the background using a layer mask.
The video is only loaded from YouTube when you play it – data (including your IP address) is then transmitted to YouTube/Google. More in the privacy policy
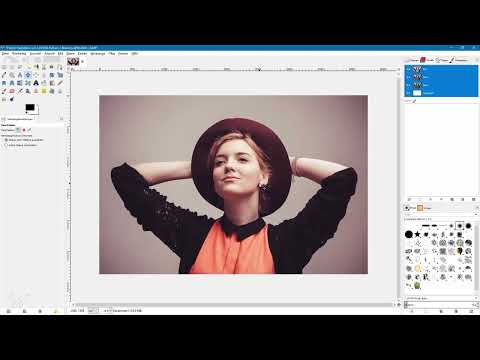
Before you get started, it is worth taking a look at the source material. The video shows several example photos where cutting out the subject hardly works without preparation, for example with a blurry background, dark hair against a dark backdrop, or bright light fringes. A neutral, single-color background when shooting will save you a lot of work later.
Key Takeaways
- An even, neutral background when shooting makes the later cutout much easier.
- With the Channel Mixer you create a grayscale mask. In the example photo, the green channel has the most contrast.
- Always work non-destructively on copies of your layers so that you can return to the original at any time.
- Dodge, Path tool, Lasso, and Brush complement each other: Each tool is suited to a different area of the image.
- The mask must be inverted at the end, because in a layer mask only the bright areas are visible.
- You improve edges with the Clone tool by taking structure from the image itself.
Step-by-Step Guide
Step 1: Analyze the Image
First take a close look at your photo before reaching for any tool. Pay attention to where the person and the background differ clearly and where they do not. In the example, the black top and the dark hat stand out well against the light, neutral background. The lighter arms, on the other hand, will probably need to be reworked manually. This assessment determines how much time you invest in which areas later.

Step 2: Duplicate the Original Layer
To work non-destructively, first create a copy of the original layer. To do so, click on the layer, duplicate it, and name the copy, for example, "Kanalmixer". The original remains unchanged and serves as a fallback in case one of the next steps does not work as desired.
Step 3: Check the Color Channels
Open the Channels dialog and look at red, green, and blue individually. Since the image is in RGB mode, it consists of three grayscale channels. First hide all channels and show only one at a time. This reveals that the red channel already has high contrast, but the green channel is even better. The hat and top stand out particularly clearly from the background here. The blue channel is significantly darker overall and is less suitable. The green channel is therefore your starting point for the mask.

Step 4: Activate the Channel Mixer
Switch to the Layers palette and select the copy named "Kanalmixer". Then open the Channel Mixer via the Colors and Components menu. Activate the "Monochrome" option so that the image appears as a grayscale image in the preview. Set the red channel to 0 and the green channel to 100. This way you work with the highest-contrast channel as a basis.

Step 5: Mix the Channels and Control the Contrast
Now move the sliders to improve the brightness distribution. With a mask, you do not need to achieve a nice black-and-white conversion. Dark areas may well appear deep black and bright areas white. In the example, you move the red channel to the left so that the background becomes darker. Then you use the blue channel to brighten the desired areas a little again. Make sure the background does not turn grayish. Confirm with "OK" at the end.

Step 6: Create a Copy for the Levels Correction
Duplicate the Channel Mixer layer and name the copy "Werte umwandeln". With this layer you increase the contrast further without changing the original layer. Open the "Levels" tool via Colors. In the histogram you see the darkest and brightest areas of the image. Move the black slider to the right so that the dark areas become deep black, and the white slider to the left to emphasize the bright areas. With the middle slider you can additionally fine-tune.

Step 7: Improve the edges with the Dodge tool
Create another copy and name it "Improve edges". On this layer, you work with the Dodge tool. Choose "Highlights" as the type so that only the already bright areas are lightened and the dark ones remain untouched. Set the paint dynamics to "Dynamics Off", adjust the brush size, and use a very soft brush. Go along the contours of the top, hat, and arms with it. For areas that are still too dark, you reduce the exposure afterwards and work with smaller brush tips. Fine-tuning the hair is especially important here. Individual strands of hair can certainly be kept.

Step 8: Create a clean line with the Paths tool
A clear black line should be created along the edges of the arms. The Paths tool is well suited for this, as it can be operated particularly precisely with the mouse. Zoom into the area and set the first anchor points along the arm with a click. While holding down the Shift key, you drag the handles so that the path runs as a smooth curve. Close the path at the end. You can correct the anchor points at any time.

Step 9: Convert the path into a selection and fill it
In the tool options of the Paths tool, activate the "Selection from Path" option. This creates a selection along your path. Switch to the "Improve edges" layer and fill the selection with the foreground color via Edit. Since the foreground color is black, a black area is created. Repeat this process for other edge areas. Then deselect the selection again.
Step 10: Paint in fine details with the brush
For delicate areas such as individual strands of hair, you need a very fine brush. Significantly reduce the brush size and choose full opacity. Make sure the foreground color is black, and paint on the "Improve edges" layer over all areas that should be visible later. Remember that you invert the mask at the end. Everything that is black now will be hidden later. Therefore, paint exactly the parts you want to remove.

Step 11: Fill inner areas with black using the Lasso
The inner surfaces of the subject should be completely black, while holes in the subject should not. Therefore, to be safe, create a copy of the original layer and move it all the way to the top. This way you can always see where real skin areas are and where the background shows through. With the Lasso tool, roughly select the areas that should become black and fill them with Ctrl + Comma. Proceed carefully, especially at fine details and on the skin, and deselect the selection with Ctrl + Shift + A.

Step 12: Fill the background with white
Now the background becomes pure white. Stay on the "Improve edges" layer, choose the Paintbrush tool, and set white as the foreground color. A somewhat harder brush with full opacity is well suited here. Enlarge the brush tip and carefully paint over the edge areas. Keep a small distance from the contour of the person. For stubborn gray spots, the Lasso tool with Ctrl + Comma is suitable. The Lasso mode is especially helpful when larger contiguous areas are gray.

Step 13: Insert the prepared mask into the cutout layer
Show the top layer again and name it "Cutout". Add a layer mask to this layer via right-click. You can freely choose the initial value of the mask, since it will be overwritten anyway. Switch to the "Improve edges" layer, copy the image with Ctrl + C, and then click on the mask of the cutout layer, not the image layer. Paste the content with Ctrl + V. Pasting a second time with Ctrl + V anchors the selection as a fixed mask. Afterwards, you delete the floating selection.

Step 14: Invert the mask
At the moment you see the background and not the person. This is because in a layer mask everything white is visible and everything black is hidden. Click on the mask, open the Colors menu, and choose "Invert". Now the person is separated from the background and the background appears white.

Step 15: Insert a color fill as a test background
To check the result, create a new layer between the cutout and Improve Edges and name it "Color Fill". Fill it with a color of your choice, for example a darker shade of red, and confirm with OK. Select the Fill tool and click once on the area. This way you can immediately see whether any light edges are left over. A strong color works particularly well for this.

Step 16: Correct light edges with the Clone tool
Duplicate the cutout layer, hide the original, and name the copy "Optimize Edges". Now work on the image layer, not on the mask. Select the Clone tool, set the brush size appropriately, set the paint dynamics to "Dynamics Off", and choose "aligned" as the alignment. With Ctrl-click, set a source in a dark area and paint over the light fringes with the soft edge of the brush. Keep setting new sources so that no visible patterns appear. Be careful not to paint over areas of skin, and reduce the brush size for fine spots. The Clone tool transfers texture from the image, so the correction looks natural. If necessary, you can lighten or darken individual spots with the Burn and Dodge tools.

Summary ??? Cutting out a person with GIMP: Step-by-step guide
You have seen how a person can be cleanly separated from the background in GIMP. The key lies in the preparation: with the Channel Mixer, you create a grayscale mask based on the highest-contrast color channel. Then you refine contours with the Dodge tool, Path tool, Lasso, and brush before inserting and inverting the mask. Finally, you clean up the edges with the Clone tool. If you take the time to plan the photo shoot and background well, your next cutout will succeed much faster.
FAQ
Why should you work non-destructively when cutting out?Because you can always fall back on the unchanged original if a step doesn't work out.
Which color channel is best suited for the mask?In the example, the green channel had the highest contrast. Which channel is best depends on the particular photo and should always be checked by comparison.
Why is the mask inverted at the end?In a layer mask, light areas are shown and dark areas are hidden. Since the mask was initially built the opposite way, it has to be flipped.
Which tools are suited for which image areas?The Dodge tool selectively brightens highlights, the Path tool creates clean curves, the Lasso fills larger areas, and the brush is suited for fine details.
Why should you photograph subjects in front of a neutral background whenever possible?A solid-color, neutral background makes the selection considerably easier and reduces the rework on edges and hair.
How do you avoid jagged edges on the contours?By not painting over the same areas again and again. A single, even stroke delivers better results than repeated retracing.
What should you do if light halos remain at the edge?With the Clone tool, you can take texture from darker areas and specifically cover the fringes. With the Burn tool, edges can additionally be darkened.
Why should the person be color-matched to the new background?A different color look between the person and the background quickly looks unnatural. Adjusting the color tones ensures a coherent overall image.


