
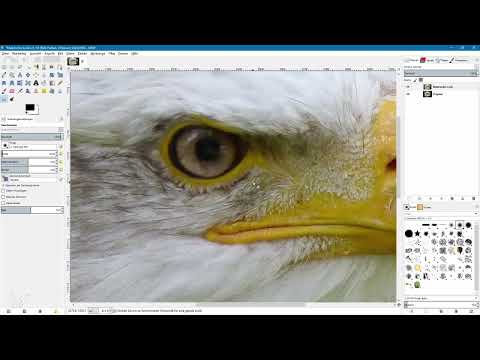
Pixelated, noisy photos don't have to end up in the trash. With the Smudge tool in GIMP, you can turn such an image into a soft, painterly composition that is more reminiscent of a painting. This guide shows you step by step how to proceed. An eagle photo that is deliberately heavily pixelated serves as the example.
The video is only loaded from YouTube when you play it – data (including your IP address) is then transmitted to YouTube/Google. More in the privacy policy
This technique is not something that takes just a few minutes. You work manually, area by area, following the contours of the subject. It is precisely this patience that makes the result so individual.
Key Takeaways
You always work on a copy of the original layer so that you can go back at any time. With the Smudge tool, you wipe along the contours and shapes, not criss-cross, otherwise you will destroy important details such as the eye. A graphics tablet with a pressure-sensitive brush tip makes the work much easier. Finally, you can give the image a harmonious texture with a gray noise layer and a light blur.
Step 1: Secure the Original Layer and Create a Copy
Before you get started, you duplicate your original layer. Select it and click the icon for a new layer at the bottom of the Layers panel. Then give the copy a meaningful name, for example "Painterly Look". This way you keep the original untouched and can hide the copy or recreate it completely if needed.


Step 2: Select and Set Up the Smudge Tool
Now switch to the Smudge tool, which is also known as the smudge finger tool in GIMP. Its settings are similar to those of the brush. First choose a very soft brush and then go down one level so that the transition becomes medium-soft. You can adjust the size of the brush at any time.


Step 3: Use a Pressure-Sensitive Brush Tip
Under Paint Dynamics, you can use a custom brush tip that responds to pen pressure. If you press hard on the graphics tablet, the brush becomes larger. If you press gently, it becomes smaller. A rate of about 50 is suitable to start with. Test in an inconspicuous spot how large the brush looks, and reduce it if it seems too large to you. Especially with fine structures such as the plumage, a small brush size is indispensable.


Step 4: Wipe Along the Contours
The most important principle is: Don't wipe randomly across the image. Always orient yourself to the existing shapes. With the eye, for example, the direction of the eyelid is a good guide. If you paint across such contours, details disappear, and in the worst case the eye can look completely distorted.
You can lift off and start again at any time. The slower and more deliberately you work, the cleaner the result will be. Pay particular attention to transitions where light and dark areas meet. If you pull too much color across the edge there, unsightly streaks appear.

Step 5: Deliberately Change the Wiping Direction
Sometimes it's worth reversing the direction. If you paint downward and the yellow light is missing, you may have to wipe from bottom to top to bring the color back. This technique requires practice. Over time, you will intuitively recognize in which direction you need to wipe.

Step 6: Carefully Edit the Iris and the Highlight
In the area of the iris, you can choose between circular wiping and a movement from the inside out. Both can look interesting. However, make sure that you don't pull too much black from the pupil outward.
The same applies to bright spots of light. If you drag them into dark areas, they lose their effect. Therefore, frame the spot of light and smudge around it. If you want to preserve it, you can work alternately to the left and to the right.


Step 7: Refining and softening edges
After the first passes, you will probably discover spots that look like a hard edge. You can smudge over them again at any time. In such cases, reduce the brush size to work more precisely. It is worth repeating this step several times until the image looks coherent.

Step 8: Navigating the image without moving the layer
While working, you often need to change the view section. To do so, hold down the space bar. A directional cross appears, with which you shift the visible portion of the image. The layer itself remains unchanged. This way you can edit individual areas in a targeted manner without accidentally moving anything.

Step 9: Editing the beak, the feathers and the background
The feathers show you the appropriate smudging direction through their structure. Follow them instead of smudging across them. The same applies to the beak: work along its contour and make sure you do not smudge over the edge into the plumage.
With the background you have more freedom. Here you can work over large areas with a larger brush. However, you can also select the background and edit it with the Gaussian blur. What matters is that you proceed consistently and do not leave some areas soft and others hard.


Step 10: Adding a noise layer for texture
Finally, you can give the image a slight noise so that it does not look too smooth. To do this, create a new layer above all the others and fill it with a medium gray. Name the layer "Noise" and set the layer mode to "Hard Light".
Then choose HSV Noise via the menu "Filters", "Noise". Drag the sliders for Value and Saturation to the right and then confirm. The noise pixels often look too harsh at first.


Step 11: Blurring the noise and adjusting the opacity
Now apply the Gaussian blur to the noise layer. A radius of one to two pixels is usually enough. After that, you can switch the layer mode from "Hard Light" to "Soft Light". The image then looks softer overall. If the noise is still too strong for you, reduce the opacity of the layer, for example to 80 percent.


Before and after comparison
In the end, compare the original with your result by showing and hiding the layers. Pay particular attention to the area of the eye and the beak. The original shows strong artifacts, while the edited version looks soft and painted.

Summary ??? GIMP painterly look: Creating photos with the Smudge tool
With the Smudge tool, you transform pixelated photos into painterly works of art. You work on a copy, smudge along the contours, adjust brush size and pressure dynamics, and finally complement the result with a noise layer. The technique takes time and patience, but rewards you with a very individual look. Try out different smudging directions, because that is exactly where your personal style lies.
FAQ
Do I absolutely need a graphics tablet?A graphics tablet is not strictly necessary, but it makes working with pressure-sensitive brush tips much easier.
Can I undo a mistake?Yes, you can undo steps at any time. You can also hide or delete the copy layer and start over.
Which smudge direction is the right one?There is no universally valid direction. Follow the contours of the subject, for example the growth direction of the feathers or the curve of the eyelid.
Do I have to apply the technique to the whole image?No, you can also edit only individual areas. The only important thing is that you distribute the look consistently across the image in the end.
Why should I add noise?The noise prevents the image from looking too smooth and artificial. It gives the soft areas additional texture.
How long does the editing take?For a subject like the eagle, according to the tutorial you need about half an hour. However, the time depends heavily on image size and level of detail.


