
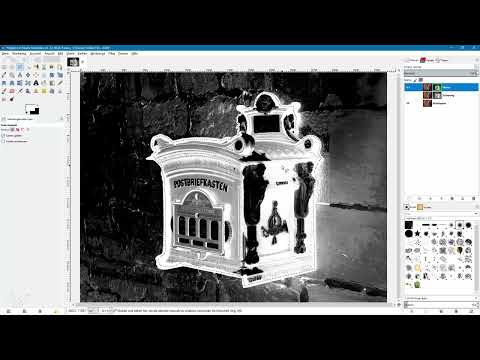
A mailbox in front of a textured background is a typical challenge. The colors do stand out, but wall textures and shadows make any selection difficult. Using exactly this example, I'll show you in this tutorial how to cut out an object with a layer mask in GIMP. You'll learn how to use the color channels for a selection, build a mask from it, and refine it with tools such as Levels, Dodge, Lasso, and Brush.
The video is only loaded from YouTube when you play it – data (including your IP address) is then transmitted to YouTube/Google. More in the privacy policy
The route doesn't go through the path, but through the mask. This has an advantage: you stay flexible and can correct every step at any time.
Key Takeaways
- A textured background makes cutting out more difficult because textures are detected as edges. A solid-color background is much easier.
- The selection should be created from the color channel with the highest contrast between object and background. In the example, that is the red channel.
- GIMP cannot create a layer mask directly from an RGB channel. Instead, you create a selection from the channel and initialize the mask with it.
- A layer mask works in grayscale: bright areas are visible, dark areas are hidden. So check early on whether the mask is the right way around.
- Work with a duplicate of the layer so that you don't work destructively.
- Difficult spots such as horse heads or shadows are best handled separately, for example with lasso selections that you fill with black.
Step 1: Choosing the Right Subject
Before you even reach for GIMP, it's worth taking a critical look at the image. Ideal is a subject that stands out clearly from the background. A solid-color sky or an even wall makes the work much easier. The mailbox in this example stands in front of a textured surface. The color contrast between blue and orange is high, but textures remain visible that interfere with cutting out.
That is why a mask-based cutout is a good choice, instead of simply tracing the outline with the Paths tool.

Step 2: Analyzing the Color Channels
The most important step lies in the analysis. To do this, open the Channels palette and first hide all channels by clicking on the eye icons. This way you see each channel individually, without the combination of colors distracting you.
The red, green, and blue channels together make up the image. However, how strongly the subject stands out from the background in each channel varies greatly. Your goal is the channel with the clearest brightness difference between object and surroundings.

Step 3: Selecting the Best Channel
Look at each channel one after the other. In the blue channel, the mailbox appears bright and the background dark, but the dark parts of the mailbox blend into the background. In the green channel, the contrast is very weak because object and background have almost the same brightness. So these channels are ruled out.
The red channel is the best one in the example. The mailbox appears dark, the background bright, and the outlines stand out clearly. Only the horse heads and the shadow area remain problematic. Post-processing will be used for those later.

Step 4: Creating a Luminance Selection from the Channel
Since GIMP cannot create a layer mask directly from a channel, you take a detour. Activate the red channel, right-click on it, and choose "Channel to Selection". This creates a selection based on the brightness values of this channel. The selection is the basis for your mask.
Afterwards, show the other channels again so that you see the image in full color.

Step 5: Creating a Copy of the Layer and the Layer Mask
Now switch to the Layers palette and create a duplicate of the original layer. Name it "Mask", for example. Then right-click on this layer and choose "Add Layer Mask". In the dialog, choose "Initialize Layer Mask to: Selection". Since your luminance selection is still active, the mask is created exactly from it.
Make sure that the layer is a copy here as well. This way you always have the original at hand, unchanged.

Step 6: Align the mask the right way around
After creating it, the mask may be the wrong way around. A mask works in grayscale: light areas are shown, dark areas are hidden. The mailbox, however, is dark, and exactly this area would now disappear. Briefly hide the original layer to check this. If you see the background and the mailbox is missing, the mask must be inverted.
To do this, click on the mask, open "Colors" and choose "Invert". By holding down the Alt key and clicking on the mask, you can see its state at any time. Now the mailbox is light and the background is dark.

Step 7: Create a backup duplicate
Before you refine the mask, create a duplicate of the layer and name it, for example, "Backup". Move it down and hide it. If you make a mistake during the optimization, you can go back to this state at any time. In everyday work, this precaution is hardly any extra effort, but it saves you a lot of trouble.

Step 8: Increase the contrast of the mask with the Levels adjustment
The mask is now the right way around, but the contrast is still not enough. Select the mask, open "Colors", then "Levels" and the tonal correction. Drag the black slider to the right to darken the dark areas, especially the background, even further. Keep an eye on the preview while doing so.
You are only editing the mask here, not the image itself. Light or dark areas that blow out or get crushed in the process are therefore not a problem. A value of about 77 for the black point worked well in the example. Confirm with "OK".

Step 9: Lighten the edge areas with the Dodge tool
Along the contours of the mailbox there are still light gray transitions. These should become lighter without the rest of the light gray area in the image being affected. For this, you use the Dodge tool. Choose the "Highlights" mode so that only the light areas are lightened. Increase the exposure to about 75 to 80 percent and set the paint dynamics to "Dynamics off" so that the opacity stays constant.
Zoom in closer to the edge and paint along the contours. If you switch to the "Midtones" mode, you can also work across the edges without getting into the dark areas. By holding down the space bar, you can conveniently move the image section.

Step 10: Select areas with the Lasso
Inside the mailbox there are structures that you don't need. For this, choose the Lasso tool. Start at the edge, follow the contour, and close the selection by returning to the starting point. By holding down the Shift key, you add further selection areas, which is especially practical for straight lines. A click, release, drag on, and click again are enough for a straight segment.

Step 11: Fill the interior with white
Once you have selected the entire interior area, set white as the foreground color. Then fill the selection via "Edit" and "Fill with Foreground Color". It is faster with the keyboard shortcut Ctrl and comma. Afterwards, you remove the selection with "Select None".
The mailbox now appears as a white area in the mask. This is the area that will remain visible later. You will edit the difficult spots at the edge separately.

Step 12: Make the background black with the Levels adjustment
Now the background should appear completely in black. Open the Levels adjustment again via "Colors" and "Levels". This time, drag the black slider strongly to the right. But be mindful of moderation. If the slider is moved too far, stair-step effects appear along the contours. In the example, a moderate value was enough to darken the background almost completely.

Step 13: Remove remaining residues with the brush
With the brush tool, you now work out the remaining areas. Choose black as the foreground color, set the opacity to 100 percent, and take a fairly hard brush of a suitable size. Paint over the areas where individual bright spots can still be seen. You should work more carefully along the contour. For larger areas, the lasso is also suitable: you select the areas with it and fill them with black using Ctrl and comma.
It is normal for this phase to take some time. Textured backgrounds require more manual work than a single-color one.

Step 14: Editing the problem areas such as the horse heads
The horse heads and the shadow area cannot be cleanly separated via the channel. The lasso helps here. Zoom in on the spot and draw rough selections along the contour with the lasso. Holding down the Shift key, you add further parts. Holding down the Ctrl key, you subtract areas again if you caught too much.
You don't have to be perfect here. Even if you paint beyond the blue area, you can correct the mistake later with the brush. What is important is that the entire problem zone is covered in the end. Then fill this selection with black on the mask by pressing Ctrl and comma again.

Step 15: Checking the cutout
Briefly hide the mask by holding down the Alt key in order to see the entire image. Then hide the original layer and look at the result of the cutout. If a spot is not satisfactory, you correct it directly on the mask. With black you hide areas, with white you bring parts back. Make sure that you are on the mask and not on the image layer while doing so.

Step 16: Testing the cutout on a solid-color background
Finally, you check the result on a new background. Create a new layer, fill it with a color, for example a shade of red, and drag it beneath the mask layer. On this background, it quickly becomes apparent whether the cutout is clean. You can change the color of the layer at any time with the fill tool. In the example, this produced a mailbox on a yellow or orange tone.

Summary ??? Cutting out an object in GIMP with a layer mask: step-by-step guide
You have seen that a clean cutout is not created by a single tool alone. With a textured background, the mailbox initially could not be easily separated from the backdrop. The red channel provided the necessary contrast, from which you created a luminance selection. This selection became the basis of a layer mask, which you refined with levels adjustment, dodge tool, lasso, and brush. With a backup duplicate, your original image was preserved at all times. This way you can succeed at cutting out even difficult subjects.
FAQ
Why can't I create a layer mask directly from the red channel in GIMP?GIMP does not support this function. Instead, you create a selection from the channel via the context menu and use this selection to initialize the layer mask.
How can I tell whether my mask is the right way around?Hide the original layer and look at the mask. Bright areas are visible, dark ones are hidden. If your subject is missing and the background is visible, you invert the mask via "Colors" and "Invert".
Why should I work with a duplicate?A duplicate serves as a backup. If you make mistakes while editing the mask, you can fall back on the original state without having to rebuild the image.
Which dodge tool mode is suitable for the edge areas?The "Highlights" mode mainly brightens areas that are already bright. With the "Midtones" mode, you can also work across edges without affecting the dark parts.
How do I avoid jagged edges along the contours?Do not drag the black slider of the levels adjustment too far to the right. A moderate value darkens the background sufficiently without destroying the contours.
How do I correct mistakes in a lasso selection?Holding down the Shift key, you add areas; holding down the Ctrl key, you subtract them. In addition, you can rework the mask with the brush in black or white.


