
Does an iceberg in the photo not look as imposing as you'd like? With the Cage Transform in GIMP, you can deform exactly this area of the image in a targeted way, without touching the rest of the subject. The tool works similarly to a rubber sheet that you pull at selected points. You first place an outline around the object, the so-called cage, and then move individual anchor points.
The video is only loaded from YouTube when you play it – data (including your IP address) is then transmitted to YouTube/Google. More in the privacy policy
In this tutorial, I will guide you step by step through the entire process: from opening the tool, through creating the cage, to the soft integration of the altered area with a layer mask. All you need is an image file with a clearly defined subject and a bit of patience.
Key Takeaways
- You can access the Cage Transform via the icon in the toolbar or with the keyboard shortcut Shift + G.
- Always work on a copy of the layer so that the original image is preserved at all times.
- The cage does not have to trace the subject exactly. A rough outline is enough.
- Move anchor points carefully and watch out for distortions in the background, such as at the horizon.
- With a layer mask and a soft brush, you smooth out unattractive transitions between the distorted and original areas.
Step-by-Step Guide
Step 1: Find the Tool and Open the Photo
First, open the photo with the iceberg in GIMP. The Cage Transform tool is hidden behind its own icon in the toolbar. Alternatively, you can activate it with the keyboard shortcut Shift + G. With this tool, you will later create the outline that controls the deformation.

Step 2: Duplicate the Layer
Before you begin the transformation, duplicate the layer. To do this, right-click the Eisberg layer in the layers palette and choose the option to duplicate. The changes will then be found exclusively on the copy. The original remains untouched, so you can return to the original image at any time. This is called non-destructive working, and it saves you a lot of trouble when experimenting.

Step 3: Place the Cage Around the Iceberg
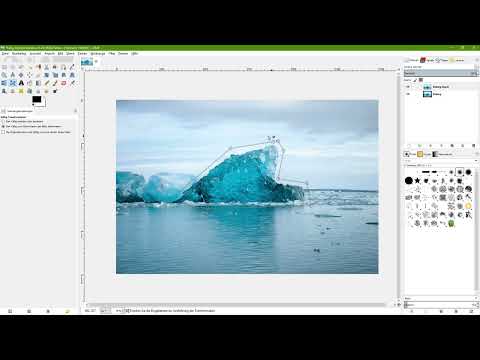
Now activate the Cage Transform tool and set a first anchor point near the iceberg. Then click another point each along the contour of the mountain. You don't have to work to the millimeter. Place the points a little more generously than the actual edges, so that the mountain is safely inside the cage. The cage later serves as a frame whose contents you deform.

Step 4: Close the Cage
To complete the outline, finally click on the starting point again. This creates a closed shape, and the tool can calculate the enclosed image content. Quickly check whether the mountain lies completely within the lines. If individual points were placed unfavorably, they can still be moved later.

Step 5: Recognize Possible Image Errors and Undo Them
The Cage Transform in GIMP can occasionally produce display errors that are unintended. Whether the tool works cleanly depends heavily on the subject. If you see unexpected artifacts after setting the cage, undo the last step with Ctrl + Z and start again. This is normal with free programs like GIMP and is not a sign that you did something wrong.

Step 6: Move Anchor Points and Enlarge the Mountain
Now it gets exciting. Click an anchor point, hold down the left mouse button, and drag it in the desired direction. In the example, you pull the point at the top edge of the mountain upward. The deformation is immediately visible in the preview. You can work in any direction this way to let the mountain grow gradually. It is best to move the points only in small steps and check the result again and again.
Step 7: Keep an Eye on the Horizon and Confirm the Transformation
Pay special attention to the horizon when moving. If you move an anchor point too much, kinks or offsets quickly appear there, which are distracting in the finished image. Drag the horizon area, if possible, so that the line continues seamlessly afterwards. When the shape looks satisfactory, you confirm the transformation with the Enter key. The distortion is then applied to the layer.

Step 8: Check the background and add a layer mask
After the transformation, a side effect often appears: since you moved not only the mountain but also the surrounding background, visible contours appear in some places, for example in the area of the clouds. These spots can be fixed with a layer mask. To do this, click on the upper, transformed layer, open the context menu with the right mouse button, and choose Add Layer Mask. In the dialog, set white as the initialization and full opacity.

Step 9: Soften transitions with the brush
Now switch to the mask by clicking on it in the layers palette. Select the brush tool, set black as the foreground color, and choose a soft brush tip. Adjust the size to the area you want to edit. Then carefully paint over the edge of the distorted area. Black hides the layer at this spot, so that the background of the original image shows through. This creates a soft transition that makes the contour disappear.

Step 10: Refine the transition
The first masking is rarely perfect. Therefore, go over the edge once more piece by piece and refine the spots that still look hard. You don't need to spend an excessive amount of time on this. Often a few brush strokes are enough for the transition to look natural. If you are unhappy with a spot, you can use white to reveal areas again and black to hide them once more.

Step 11: Compare the result with the original
Finally, you compare the result with the original image. To do this, hide the edited layer using the eye icon in the layers palette. You now see the original photo with the somewhat smaller iceberg. If you show the layer again, you can clearly see the difference. With a second look at the overall image, you can make any minor corrections if necessary before you save the file.

Summary – Make an iceberg grow: How to distort image areas with the Cage Transform in GIMP
With the Cage Transform in GIMP, you change individual image areas in a targeted way. The process begins with calling up the tool and duplicating the layer. Then you place a cage around the subject, move the anchor points, and confirm the distortion with Enter. Afterwards, you use a layer mask and a soft brush to ensure that the changed area blends harmoniously into the background. Always keep an eye on the horizon and don't hesitate to undo faulty steps.
FAQ
Does the cage have to trace the subject exactly?No, a rough outline is sufficient. It's better to place the points a bit more generously so that the entire subject lies within the cage.
Why should I duplicate the layer before the transformation?This way the original image is preserved. You can return to the original version at any time and repeat the editing.
What do I do if the transformation looks faulty?Undo the last step with Ctrl + Z and start again. Especially with complex subjects, the tool can produce unexpected display errors.
How do I avoid visible contours in the background?When moving the anchor points, pay attention to the horizon and the surrounding image area. Remaining contours can then be compensated for with a layer mask and a soft brush.
Why is the mask painted with black?Black hides the upper layer at the respective spot. As a result, the background of the original image shows through, and the transition looks softer.


