
Imagine you have a word that you don't want to simply leave as text, but want to keep editing as a shape. That's exactly what you can do in GIMP once you turn the text into a path. Afterwards you can move every anchor point, pull curves, and fill the finished shape with colors, gradients or patterns. In this tutorial, I'll guide you step by step through the entire process, from creating the text to the finished lettering design.
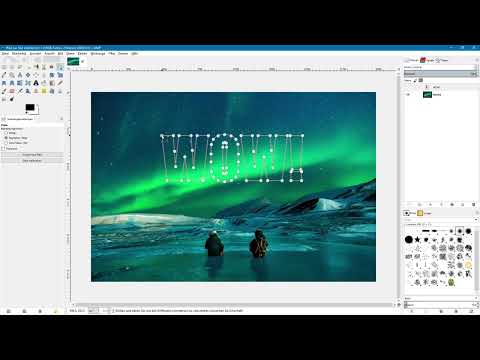
The video is only loaded from YouTube when you play it – data (including your IP address) is then transmitted to YouTube/Google. More in the privacy policy
Introduction
The starting point is a photo that sits in the layers palette as the background layer. On top of it, you place a word, convert it into a path, and then adjust that path with the path tool. You don't need any prior drawing experience. All that matters is that you know the basic functions of the tools and palettes. The tutorial takes just under five minutes in the video, and with a little practice you can complete the process in a few minutes.
Key Takeaways
- A path can be created from text via the context menu, which can then be edited like any other vector shape.
- With the path tool and the Ctrl key you create curves; if you additionally hold the Shift key, the handles stay symmetrical.
- The path becomes a selection that you fill with color, gradient or pattern.
- A transparent layer prevents the fill from covering or altering the background image.
Step-by-Step Guide
Step 1: Create Text
First select the text tool and click once in your image. Then enter a word; in the video it is "WOW". The word appears as its own text layer above the photo. Make sure you don't accidentally confuse the text layer with the background, because the next step refers exclusively to this layer.

Step 2: Adjust Font Size
A small font size is unfavorable for editing. In the video, the size is roughly quadrupled via the tool options until the word looks large enough. Then position the text at the desired spot. The size can be readjusted at any time as long as the text layer is still present as text.

Step 3: Create Path from Text
Make sure the text layer is active, meaning it was selected with the text tool. Then right-click on the text and choose the entry "Path from Text" in the context menu. At first nothing seems to change. But open the paths palette, and there you will now find a newly created path. Show it using the eye icon, and it will appear as a red outline in the image.


Step 4: Hide Text Layer and Check Path
Switch to the layers palette and hide the text layer. Now you only see the path. Activate the path tool and click on the outline. The visible anchor points show you that it is indeed an editable path. Each of these points can be moved, and that is exactly the basis for all further adjustments.

Step 5: Convert Corners into Curves
Suppose you want to change the top left corner of the letter W. There is currently a hard corner there. With the path tool active, hold down the Ctrl key and click on the anchor point. Then, holding the left mouse button, drag to the right until a curve forms. Release the mouse button, keep holding Ctrl, and click on the same point again. If you drag to the left this time, two handles appear, with which you can control the curvature more finely.


Step 6: Align Handles Symmetrically
On the first attempt, the two handles are often of different lengths and unevenly aligned. This can be improved. Undo the last change so that you have a corner again. Then hold Ctrl again, click on the anchor point and drag to the right. Now additionally hold down the Shift key. This way both handles move simultaneously and stay symmetrical to the anchor point.

Step 7: Moving Anchor Points
Once the shape is basically right, you can move individual points as needed. Click an anchor point with the left mouse button and place it in a new position. This changes the outer contour of the word. In the video, the changes are deliberately exaggerated to make the effect clear. For a balanced result, small adjustments are often enough. In the example, the instructor leaves the O in the middle unchanged, which can also be a good decision if you already like a shape.


Step 8: Creating a Selection from the Path
The adjusted path now becomes the selection. To do this, create a new, empty layer using the icon in the layers palette and name it, for example, "Transparent". The layer should be transparent so that your fill later only fills the shape of the word. Then switch to the paths palette, right-click the path, and choose "Selection from Path". Hide the path using the eye icon so you can see the selection without distracting lines.


Step 9: Testing the Selection with a Gradient
Once you have hidden the path, the anchor points are only visible while the path tool is active. If you switch to the gradient tool, the points disappear. You can now fill the selection with a gradient, for example a black-and-white gradient. To do this, click once in the image, drag the mouse, and release it. The result is a colored area that follows the shape of the word exactly. In the video, this step is then undone because a single-color fill is desired.

Step 10: Filling the Selection with the Background Color
For a uniform fill, choose the entry "Fill with Background Color" in the "Edit" menu. The selection thereby receives the currently set background color, white in the example. Make sure the transparent layer is active, otherwise the fill will end up on a different layer. The result shows the word clearly and in the desired color.

Step 11: Removing the Selection
Finally, you remove the selection via the "Select" menu and the "None" entry. This removes the marking, and you can check the result without a distracting outline. If you don't like the result yet, simply return to the path and adjust more anchor points.

Summary ??? GIMP: Converting Text to a Path and Adjusting Anchor Points
You have learned how to create a path from text via the context menu and how to refine it with the path tool. With Ctrl and Shift you shape curves and symmetrical handles, and with individual anchor points you change the contour. The finished shape is filled via a selection on a transparent layer. This gives you a tool with which you can design lettering individually, without needing templates.
FAQ
Do I have to delete the text layer after creating the path?No, you don't have to delete it. It is enough to hide it so that it doesn't get in the way. That way it is preserved in case you want to go back to the original text later.
Why do I still see the anchor points after creating the selection?The points remain visible as long as the path tool is active. Switch to another tool, such as the gradient tool, and they disappear.
What do I need the Shift key for when dragging the handles?With the Shift key, both handles of an anchor point move simultaneously. This keeps them symmetrical, and the curve looks smoother.
Why should the fill be on a transparent layer?On a transparent layer, the fill only lands inside the selection. The background photo remains unchanged, and you can still move or adjust the layer later.

