
An image is only truly finished once it is safely saved. The file format determines whether you can continue working on it later, how large the file will be, and how well the image quality is preserved. GIMP offers a wide selection for this, and this is exactly where uncertainty often arises. This guide shows you how to use the save options and which format suits which purpose.
The video is only loaded from YouTube when you play it – data (including your IP address) is then transmitted to YouTube/Google. More in the privacy policy
You will learn about two different ways of saving: GIMP's own format for later editing and exporting for sharing. You will also get an overview of the most important export formats with their strengths and weaknesses. The procedure is easy to understand for beginners, and you can try it out directly on your own images.
Key Takeaways
- GIMP distinguishes between "Save As" and "Export As". Each serves a different purpose.
- The XCF format saves all layers and settings and is ideal for continuing work later.
- For sharing, for example on the internet or by email, you use an export to another format.
- JPEG is lossy and suitable for photos with many colors, but loses quality with every save.
- PNG supports millions of colors and fine transparencies, but produces larger files than JPEG.
- GIF is limited to 256 colors and is only useful for simple graphics or small animations.
- The file extension can be controlled in the export dialog via the file type display, and GIMP automatically adjusts it when you select a format.
Step-by-Step Guide
Step 1: Understanding the Starting Situation
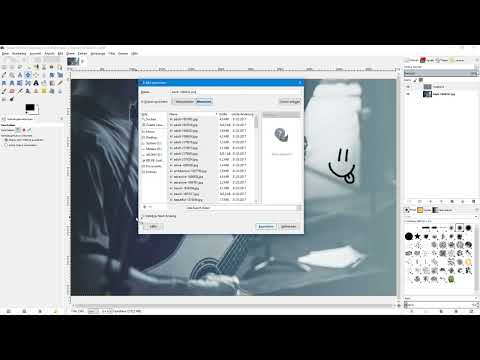
Before you save, it is worth taking a look at the layers palette. There you can see all the layers of your project, in the example the original photo at the bottom and above it a transparent layer called "testebene". On this layer there is a smiley painted with the brush tool. With the move tool, the smiley can be positioned freely, and a click on the eye icon hides the layer again. These layers are exactly what you want to preserve when saving.

Step 2: Saving Your Work in the XCF Format
If you want to interrupt your work and continue later, save the image in GIMP's own XCF format. To do so, open the "File" menu and choose "Save As". There you can name the file and select the XCF format. With a click on "Save", the file is secured.


Step 3: Good to Know About the XCF Format
The XCF format is GIMP's working format and can be compared to Photoshop's PSD format. It saves not only the visible image, but all layers, settings, and changes. When you open the file later, you will find everything just as you last left it. However, XCF is unsuitable for sharing with others, since not every program can handle this format. For that, you need the export.

Step 4: Preparing the Export
If you want to publish the image on the internet or send it to friends, you do not choose "Save As", but "Export As". This function creates a new file in a different format, while your XCF file with all its layers remains untouched. You should also think about the image dimensions. An original size makes files unnecessarily large, so reducing it is often sensible. In the video, the dimensions remain unchanged, since it is only about the format here.

Step 5: Exporting the JPEG Format
JPEG is one of the best-known image formats and is frequently used on the internet and by digital cameras. It works with compression, and you can determine for yourself how strongly the image is compressed. The higher the compression, the smaller the file, but also the greater the risk of quality loss. Colors then appear paler, edges blurry, and unsightly artifacts can appear. For photos, therefore, choose a moderate compression value and check the result on screen.

Step 6: Export the PNG format
If you would rather use the PNG format, select it at the top of the export dialog. GIMP automatically recognizes the selected format and adjusts the file extension accordingly. Clicking "Export" then saves the image as a PNG. Depending on the format, GIMP offers additional settings that would go beyond the scope of this guide. For getting started, the default values are completely sufficient in most cases.

Step 7: Show all available file formats
At the bottom of the export dialog, there is an option to display the file type. To do this, click the small plus icon. You will then see the complete list of all formats that GIMP supports when saving. You can scroll through the list and select the desired format manually. The file extension is adjusted automatically.

Step 8: Comparison of the most important formats
The GIF format used to be very popular on the internet because it allows for small files. It can define a single color as transparent and can even display simple animations. However, it supports a maximum of only 256 colors, so it is no longer suitable for photos today.

The JPEG format supports millions of colors and offers adjustable compression. However, it is lossy, and every time you reopen, edit, and save in JPEG format, you lose more quality. The file is therefore ideal for the finished publication, but less suitable for intermediate stages.

The PNG format supports millions of colors and fine gradations of transparency. A pixel can therefore be fully opaque, fully transparent, or semi-transparent. It is particularly suitable for graphics, logos, and images with soft transitions, but produces larger files than JPEG for photos.
The PDF format is usually used for documents such as forms or digital magazines. However, a PDF can also contain just a single image if you want it to.
The TIFF format is often used by print shops. It supports transparency and millions of colors, but usually results in larger files.

The BMP format saves images uncompressed, does not support transparency, and produces very large files. For most purposes, it is no longer recommended today.
Step 9: Flexibly adjust file names and extensions
In the export dialog, you can enter a name for the file at the top, such as "Test". If you enable the option to show the file extension at the bottom, you can also change the extension yourself, for example to "test.png". When you click "Export", the settings for PNG will then be offered automatically. If, on the other hand, you enter "jpg" at the top, the options for JPEG appear. This way you can directly specify which format you want if you already know it.
Summary ??? Saving images correctly in GIMP: understanding file formats and exporting deliberately
You have seen that GIMP offers two clearly separate ways of saving. With "Save As" in the XCF format, you secure your work with all layers, so that you can continue at any time. With "Export As", you create a file in a suitable format for sharing. JPEG is suitable for photos with a small file size, but loses quality with every save. PNG preserves colors and fine transparency, GIF is only of interest for simple graphics, and TIFF and PDF have their strengths in print and documents. By displaying the file type, you retain full control over the format.
FAQ
Why should I use XCF instead of JPEG for my working file?XCF saves all layers and settings, so you can later continue exactly where you left off. JPEG only saves the finished image in compressed form.
What is the difference between "Save As" and "Export As"?"Save As" saves your project in GIMP's own format with all layers. "Export As" creates a copy in a different format, for example for the internet or for sending.
Does a JPEG image lose quality every time it is saved?Yes, JPEG is lossy. Every time you save again in JPEG format, the quality is reduced further, especially with high compression.
When should I choose PNG instead of JPEG?PNG is suitable if you want to preserve all colors or use transparency, for example for logos or graphics. For photos, however, the files are usually larger than with JPEG.
Can I also save photos with GIF?This is not recommended. GIF supports only 256 colors, so a photo loses significant color depth and quality.
How can I change the file format in the export dialog?You can choose the format using the selection at the bottom of the dialog or adjust the file extension directly at the top. GIMP then automatically recognizes the desired format.


