
When you first launch GIMP, the interface may look cluttered at first glance. Menus, toolbox, dockable dialogs, and image window compete for your attention. The good news: GIMP follows a clear basic principle, and once you have understood it, finding your way around becomes much easier.
The video is only loaded from YouTube when you play it – data (including your IP address) is then transmitted to YouTube/Google. More in the privacy policy
In this tutorial, you will get to know the individual areas of the interface. You will learn how to open, close, rearrange, and freely position panels on the screen. Finally, I will show you how to set up GIMP for working with one or more monitors. You can follow the steps directly while you have GIMP open.
Key Takeaways
The title bar shows you the program name, file name, color mode, and the exact pixel dimensions of your image. The menu bar bundles all functions, and the toolbox gives you quick access to the most important tools. Panels can be grouped as tabs, closed, added again, rearranged, detached, and docked again. With the Tab key, you hide and show all panels. For multi-monitor use, single-window mode in its deactivated state is suitable, because then you can drag panels to a second screen.
Step-by-Step Guide
Step 1: Reading the Title Bar and Image Information
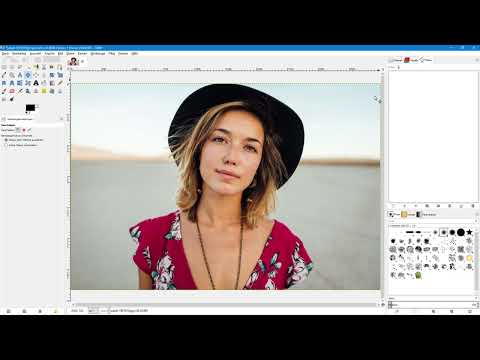
At the very top in the title bar, next to the program name, you will find the name of the currently opened file. Right next to it, in parentheses, is the current color mode, RGB in the example. You can also see the exact pixel dimensions of the image. In the example photo, it is 2500 pixels in width and 1667 pixels in height. You should keep an eye on this information as soon as you start editing, because size and color mode affect later results.

Step 2: Exploring the Menu Bar
Below the title bar is the menu bar. It contains a great many functions hidden in submenus. Clicking on "File", for example, opens a menu with commands for opening, saving, and exporting. As you move from menu to menu, you quickly notice how extensive GIMP is. You do not need to know all the commands at the beginning. What matters is only that you know where to find them.

Step 3: Using the Toolbox
On the left side is the toolbox. Here you activate tools by clicking on the respective icon. As an example, select the rectangle select tool. You can also reach the same tool via the menu bar under "Tools" and "Selection Tools". So GIMP offers several ways to the same goal, and you can choose the one that feels most natural to you.
Step 4: Adjusting Tool Options
Directly below the toolbox, you see the tool options. They adapt automatically to the currently active tool. If you switch, for example, from the Move tool to the rectangle select tool, the options below change immediately. There you can adapt the tool precisely to your task.
Step 5: Understanding Panels as Tabs
In GIMP, panels are often displayed as tabs. You recognize them by a kind of flap at the top edge, with the respective settings underneath. If you insert another panel as a tab into the same group, a group with several tabs is created. In the example, three panels are combined this way. With a click on the desired tab, you switch between them.
In the example, you see the "Layers" tab. The image here consists of only a single layer. A click on the "Channels" tab shows you the red, green, and blue channels corresponding to the RGB color mode. The "Paths" tab shows that the image currently contains no paths.
Step 6: Closing Unneeded Tabs
If you do not need a panel, you can close it to tidy up your interface. The example shows the "Paths" tab, which you usually do not need in your work. First click on the tab so that it is active. Then open the small menu icon with the three lines at the top right of the group and select "Close Tab". The tab and the panel then disappear.
Step 7: Adding Closed Panels Back
Don't worry, you can bring back closed panels at any time. To do so, click the arrow icon of the group again and select "Add Tab". In the list, you will find all available panels. If you select "Paths", for example, it is added to the far right of the group. Afterwards you can click on "Layers" again, and the original arrangement is restored.

Step 8: Change the order of the tabs
You can adjust the order of the tabs to suit your way of working. If you mainly work with layers, often with paths and rarely with channels, you sort the tabs accordingly. To do this, left-click on a tab, such as "Paths", hold the button down and drag it to the desired position, for example to the middle of the row. When you release the mouse button, the new order is applied.

Step 9: Detach panels and place them freely
Individual tabs can be detached from a group and arranged as a free-floating panel. To do this, hold down the "Channels" tab with the left mouse button and drag it out of the group. Then release it anywhere over the image. The panel now floats freely and can be moved and adjusted as desired. The group then consists only of the remaining panels.

Step 10: Dock floating panels again
You can also anchor a free panel firmly in the interface again. Grab the tab of the floating panel and drag it to the edge of another panel. A blue line appears, showing you the docking position. As soon as you release the mouse button, the panel is docked on the left. Via the arrow you can add further tabs, for example a journal. This creates a group of two panels that you can configure as you like. This principle applies to the entire program. Panels that are arranged as a group on the right or left can also be changed in this way.

Step 11: Use image tabs in the main window
You will also find tabs in the image area in the middle. There, every opened image is displayed with a preview. If you open another file via "File" and "Open", a second tab appears at the top. With a click on the respective tab, you switch between the images. With the X symbol, you close a file again.

Step 12: Hide all panels with the Tab key
If you want to concentrate fully on your image, hide all panels. To do this, go to "Windows" and select "Hide Docks" or press the Tab key once. All panels disappear. Pressing the Tab key again or clicking "Hide Docks" in the menu brings them back.

Step 13: Understand single-window mode
Under "Windows" you will also find single-window mode. If you work with only one monitor, I recommend this mode. In it, all panels remain docked in the program window and are arranged clearly.
Step 14: Set up GIMP for multiple monitors
If you work with several screens, it can be helpful to deactivate single-window mode. To do this, click once on the mode in the "Windows" menu. After that, all panels are free-floating. You can now drag a panel to your second monitor and leave all panels open there. The image remains visible on the main monitor. With the key combination Ctrl + Shift + J, you fit the image to the window and can thereby display it larger. This way you concentrate fully on editing.


Step 15: Back to the docked interface
If you want to use the workspace in the classic way again, click on "Windows" again and activate single-window mode. The program window then floats as a whole. Maximize it again, and the docked panels are available to you once more. With Ctrl + Shift + J, you then fit the image into the workspace again.

Summary ??? Customizing the GIMP interface: layout, tabs and multi-monitor operation
GIMP is clearly structured. Title bar, menu bar, toolbox and panels form the basic framework. You can group panels as tabs, close them, add them again, rearrange them, detach them and dock them. With the Tab key, you hide all panels when needed. Single-window mode is particularly suitable for single-monitor setups, while you deactivate it for operation with several screens so that you can move panels freely. Once you master these basics, you can adapt GIMP to your personal workflow.
FAQ
Question: How do I recognize the color mode of my image?Answer: The color mode is shown in the title bar in parentheses after the file name, for example RGB.
Question: Can I restore a closed panel?Answer: Yes, click on the arrow icon of the group and select "Add Tab". There you will find all available panels.
Question: How do I temporarily hide all panels?Answer: Press the Tab key or select "Hide Docks" under "Window". Pressing it again will show them again.
Question: How do I change the order of the tabs?Answer: Click on the tab with the left mouse button, hold the button down and drag it to the desired position.
Question: How do I create a panel as a floating window?Answer: Drag the tab out of the group while holding down the left mouse button and release it over the image.
Question: How do I dock a floating panel again?Answer: Drag it to the edge of another panel. A blue line shows the docking point.
Question: Why should I disable single-window mode when using multiple monitors?Answer: Without single-window mode, panels can be moved freely and dragged to a second monitor, while the image stays on the main monitor.


