
An airplane, a hot air balloon, or a red ball against a blue sky: for you as a human, the boundaries are immediately visible. GIMP, on the other hand, sees only a collection of pixels with different color values. This is exactly where this tutorial comes in. You will get to know four tools that work based on colors and contrasts, and you will learn how to use them to create a clean layer mask. The tutorial follows the video "Bildbearbeitung mit GIMP: das Tutorial für Einsteiger – 33 Auswahlwerkzeuge II – feine Auswahl" by Marco Kolditz.
The video is only loaded from YouTube when you play it – data (including your IP address) is then transmitted to YouTube/Google. More in the privacy policy
Key Takeaways
- GIMP analyzes color differences and contrasts between pixels, not the image content as you perceive it.
- The Fuzzy Select tool selects similar colors locally around the click point, while "Select by Color" searches the entire image.
- The "Sample Merged" option also takes the underlying layers into account.
- The Scissors Select tool is suitable for rough outlines, but is usually not the first choice for clean cutouts.
- Foreground Select usually delivers the cleanest results, because you specify to GIMP the color ranges of foreground and background.
- A layer mask can be refined with the brush at any time. This makes corrections easy.
Step 1: The Fuzzy Select Tool and the Threshold
You can find the Fuzzy Select tool in the toolbar. You can also access it via the keyboard shortcut U. The name sounds like magic, but the function is based on a simple color analysis. When you click into an image with the Fuzzy Select tool, GIMP selects pixels that resemble the clicked color tone.
The threshold in the tool options is important. By default, it is set to 15. At this value, only pixels with nearly identical color are captured. If you drag the slider to the right and click into the image again, more similar colors are included. It is faster if you drag right or left directly in the image while holding the left mouse button. You will see a live preview of which color tones are currently being selected.
Note that the Fuzzy Select tool works locally. If you click on a red ball, similar shades of red near the ball are selected, but not other red objects in the rest of the image.

Step 2: Select by Color for the Whole Image
If you want to capture all objects of a certain color in the entire image, switch to the "Select by Color" tool. It is located in the same tool group as the Fuzzy Select tool. The settings are similar to the previous ones, but the search now extends across the entire image.
For example, click on a yellow ball. GIMP then searches the entire image for similar shades of yellow. Here too, you can adjust the threshold by dragging with the mouse. This way, you can select, for instance, all yellow or yellow-like areas in the image in one go.

Step 3: Antialiasing, Feather Edges, and Sample Merged
In the options of both color tools, you will find the switches "Antialiasing" and "Feather Edges". They correspond to the options from the previous selection tools. The "Sample Merged" option, however, deserves special attention.
To understand its effect, create a new empty layer and draw a circle on it, which you fill with a shade of red. Now there are two layers in the layers palette: the red circle and the photo below it. If you click with the color tool on the transparent area of the upper layer, only the transparent area of this layer is selected. You undo this step again with "Select None".
Then activate "Sample Merged" and click on the red circle again. Now GIMP searches the entire visible image, including the photo layer below. If you increase the threshold, more red objects in the photo are selected. If you deactivate the option again, GIMP only considers the colors of the current layer.
Step 4: The Scissors Select Tool
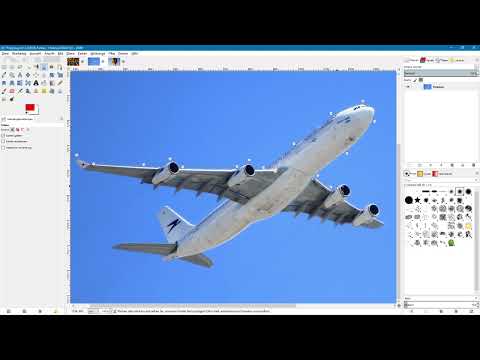
You can access the Scissors Select tool via the icon in the toolbar or with the keyboard shortcut I. With this tool, you assist GIMP by searching for contrasts in the image together with GIMP. You place individual points along the contour of the object, in this example the airplane. Between the points, GIMP searches for strong contrasts and places the selection along the detected edges.
The name says it all, because the scissors actually "snap" to contours. However, this does not always work reliably. If you place a point too far from the edge, you can click on it afterward and move it while the scissors are active. If you confirm the selection with the Enter key, you get a selection that can be transferred into a new layer using Ctrl+C and Ctrl+V, for example. However, the result is often imprecise and untidy at the edges. The tool is therefore only conditionally suitable for precise cutouts.


Step 5: Marking the Foreground Selection
You can find the Foreground Select tool via the corresponding icon in the toolbar. In practice, it delivers the cleanest cutout of the four tools presented. You give GIMP an area in which the object is located, and then define which colors should be taken into account.
In the tool options, you first select "Mark foreground". Use the mouse to roughly mark an area within the object. GIMP then displays the unselected areas in color. You can set the preview color at the bottom. For a blue sky, for example, red is recommended so that the differences are more clearly visible.


Step 6: Defining Colors in the Object with the Brush
After the rough marking, the mouse pointer changes to a brush. Use the slider to set the size. Now click inside the object and drag while holding down the left mouse button. This tells GIMP which colors in the object are important. Mark as many shades as possible in the hot air balloon without touching the sky. You don't have to work in detail; it is enough if GIMP knows the main colors.
When you release the mouse button, GIMP calculates for a moment and shows you the new selection. If necessary, you can click into the image again at any time and add more colors. If the background is stubbornly being selected as well, use the "Mark background" option and specifically mark the disruptive color, such as the blue of the sky, as background.
With the "Smoothing" option, you determine how hard or soft the outline of the selection turns out. In the video, a value of 3 was used, which worked well. Feel free to experiment with the value until the edge suits your image. If you then press Enter, you will see the final selection.


Step 7: Creating and Moving a Layer Mask
Now you create the actual cutout. First, duplicate the layer by right-clicking and selecting "Duplicate Layer". Then add a layer mask by right-clicking on the layer copy. There, choose the option "Selection" so that the mask is created from your current selection, and confirm with "Add".
Afterwards, deselect with "Select None". When moving things afterwards, pay attention to whether you are moving the image or the mask. If you switch to the Move tool and drag the balloon, you may be moving only the mask. This is exactly what happened in the video. Therefore, click on the image in the layers palette before you move it. The hot air balloon is then cleanly cut out.

Step 8: Refining the Mask
A major advantage of the layer mask is that you can correct it at any time. If areas that actually belong to the object are missing, you paint them back into the image with the brush. To do this, zoom in on the spot where you want to work. Choose a small brush tip, for example with a diameter of three pixels, and set the foreground color to white.
Make sure that you are on the mask and not on the image itself. White on the mask makes areas visible, black hides them. So if you want to bring back missing parts, you paint over the corresponding spots with white. This way you optimize the cutout step by step.


Summary – Fine Cutouts in GIMP: Mastering Selection Tools for Layer Masks
You have learned about four tools that are based on colors and contrasts: the Magic Wand, "Select by Color", the Intelligent Scissors, and the Foreground Select. The Magic Wand and the color tool are suitable for clearly delineated areas of color, with "Sample Merged" taking multiple layers into account. The Intelligent Scissors help with rough contours but rarely deliver clean results. The Foreground Select is convincing for more complex subjects because you specify the relevant colors to GIMP. From the selection, you create a layer mask that you can refine with the brush at any time. With this workflow, you achieve more precise cutouts than with a simple quick selection.
FAQ
What does the threshold do for the Magic Wand?The threshold determines how similar colors must be to the clicked pixel in order to be selected as well. The higher the value, the more shades are captured.
Why doesn't the Magic Wand select the entire image?The Magic Wand works locally and only captures similar colors near the click point. For the entire image, you use the "Select by Color" tool.
What does the "Sample Merged" option do?It ensures that GIMP takes the entire visible image into account when selecting, and not just the current layer.
Is the Intelligent Scissors tool suitable for clean cutouts?Not really. It is suitable for rough outlines, but often produces unclean edges. For precise results, the Foreground Select tool is usually the better choice.
What is the preview color used for in Foreground Select?It shows you which areas have not yet been selected. You can choose the color so that it stands out well from the subject.
How do I correct a layer mask?You paint with white on the mask to make areas visible, and with black to hide them. Make sure that you have selected the mask and not the image.


