
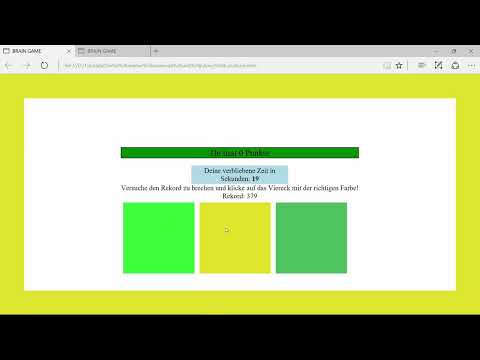
A timer counts down, a border color lights up in a square, and you have only a few seconds to click the right field. This exact game is the focus of the Brain Game chapter. In the video, the instructor presents the game idea, shows how to operate it, and explains which functions, variables, and elements you need for the implementation. This guide picks up the most important points of the video, organizes them, and breaks the task down into manageable steps. That way you know what to pay attention to before you write the first line of code.
The video is only loaded from YouTube when you play it – data (including your IP address) is then transmitted to YouTube/Google. More in the privacy policy
Key Takeaways
- The Brain Game consists of a start button, a timer, a record display, three squares with random colors, and a game-over screen.
- The random colors are the central sticking point. You need a solution to generate them, whether you write it yourself or research it.
- Functions, variables, and HTML elements have to work together so that the score, timer, and game state are correct.
- The implementation is divided into three parts: first HTML and CSS, then JavaScript and jQuery for the functionality.
- The goal is not a professional game, but a feel for how you turn an idea into code step by step.
Step-by-Step Guide
Step 1: Understanding the Start Screen
The entry point to the game is a text that behaves like a button. A click on "Klicke hier um das Spiel zu starten" sets everything in motion. Technically, this is not a classic button, but an element that is meant to react to a click. Keep in mind that for this you need a click command that triggers the game function.

Step 2: Timer, Record, and the Three Squares
After the start, a timer appears that counts down in seconds. In the video, it starts at 20 seconds and keeps running in the background, regardless of what you click. Next to it is the record, which is empty at the beginning and could be preset with a zero. Below are three squares that get new colors in every round. These squares are the places where you make your clicks.
Step 3: Random Colors and Recognizing the Right Click
The color you are looking for is in the border of one of the squares. Since it is random, you have to figure out how to generate a random color in code. In the game, you then click the square with the matching border color. Afterwards, a new color appears, and the position of the buttons also changes each time. The color space is very large, so duplicate colors are theoretically possible, but in practice unlikely.

Step 4: Points, End of Time, and Game Over
Every correct hit increases your score. When the time is up, the round ends, and the game-over screen shows the score you achieved. A click on it starts a new game with zero points. Make sure to manage the current score and the saved record separately from each other. The record has to persist beyond the round, whereas the current score does not.

Step 5: Defining the Behavior on Wrong Clicks
A wrong click changes the game state. In the instructor's first example, the entire background turns black, and the round is over. Later he shows a second variant: there, only the individual squares and their borders turn black, while the rest of the page remains unchanged. Decide on a variant before programming, because it determines which elements you have to address.

Step 6: Trying Out the Finished Test Version
Before you program it yourself, it is worth taking a look at the finished version. The instructor has uploaded the game to his site at putorials.de/game/brain.html. There you can test the mechanics at any time and develop a feel for the difficulty. Situations with very similar colors, where you have to look very closely, are particularly revealing.
Step 7: Identifying the Required Functions and Variables
The game is more than a few lines of code. You need functions for starting the game, for creating the buttons, and for the random color. In addition, there are variables for the record, the current score, and the game state, that is, the question of whether a game is currently running. You also have to access elements from the HTML and make sure that the border always has the color of the target. The instructor needed about 200 lines of code for his solution. This number is a guideline, not a requirement.

Step 8: Research Instead of Getting Stuck
You don't have to know everything by heart. If the random color is giving you a headache, you can write your own function or search the internet for a ready-made solution, for example on Stack Overflow. What matters is that you understand the solution before you build it into your project. The instructor nevertheless expressly recommends implementing the game yourself, because it is primarily about the approach to programming.
Step 9: Break the Idea Down into Sub-Steps
The most important step lies in the planning. Think about which tasks need to be completed one after another, for example: make the start button respond, start the timer, generate colors, evaluate the click, count points, and display Game Over. The instructor divides the project into sections. In the first video, the HTML and CSS part is created so that the interface looks like it does in the game. After that comes the functionality with JavaScript and jQuery.
Step 10: Implement the Game State and the Game Over Behavior
To start the game, you need a function that initializes the game. This includes a variable that keeps track of whether you are currently playing or not. For Game Over, it makes sense to have a separate function that stops the time and changes the color of the button. The instructor also shows that you can keep clicking after a wrong click. You could prevent this by disabling input during Game Over. Another click then starts the next round.

Step 11: Address the Clickable Squares Correctly
In the technical sense, the squares are not buttons. The instructor uses div elements for them, which work like buttons through click events. The red element in the game is also a div, and the two elements are addressed differently because they take on different tasks. Pay attention to which HTML tags you use, and target each element specifically via classes or IDs.

Step 12: Make Use of the Preview of the Next Videos
Before you start, try to build the HTML and CSS part yourself. In the next video, the instructor shows his solution, and in the one after that, the programming with JavaScript and jQuery follows. Plan for several hours for the complete project, especially if you still lack basic knowledge of programming languages. When you are done, you can compare your solution with the instructor's and see which approaches differ.
Summary – Brain Game with jQuery: Game Idea, Structure, and Approach
The Brain Game combines simple game rules with a manageable but versatile programming task. You need a start button, a timer, a score display, three clickable squares with random colors, and a Game Over state. The biggest challenge lies in the random color and in the interplay of functions and variables. If you break the task down into sub-steps, implement the HTML and CSS part first, and research when needed, you will manage the implementation piece by piece. The test version on putorials.de helps you understand the desired game mechanics.
FAQ
What is the goal of the Brain Game?The goal is to collect as many points as possible within the available time by clicking the square with the correct border color.
Do I have to program the game myself?The instructor expressly recommends implementing the game yourself before you look at the solution in the next video.
Do I need prior knowledge?Without basic knowledge of programming languages, you will need several hours, according to the instructor. Basic knowledge of HTML, CSS, and JavaScript makes getting started much easier.
May I search the internet for solutions?Yes, research is expressly allowed, for example for a ready-made function to generate random colors. What is important is that you understand the code before you use it.
Where can I test the finished game?You can find the instructor's version at putorials.de/game/brain.html. There you can try out at any time how the game is supposed to behave.


