
A click on a button looks simple from the outside, but behind it the code quickly requires a lot of typing. If you write out document.getElementById every time in JavaScript, the code quickly becomes long and hard to read. In this tutorial, I'll show you how to handle clicks on buttons, paragraphs, and custom-designed elements much more concisely with jQuery. You start with a classic JavaScript example, convert it to jQuery, and finally apply what you've learned yourself.
The video is only loaded from YouTube when you play it – data (including your IP address) is then transmitted to YouTube/Google. More in the privacy policy
Key Takeaways
- jQuery replaces long calls like
document.getElementByIdwith the dollar sign$and a selector in parentheses. - For an ID you use the hash
#, for a class you need the dot., and for HTML tags the tag name is enough. - The
.click()method executes a function as soon as the element is clicked. - With
.html()you read the content of an element or overwrite it. - For jQuery to work, the library must be included beforehand, for example via a CDN link.
Step 1: Understanding the starting point in the source code
Before you change anything, you should know what you're starting with. Your document contains an empty paragraph with an ID as well as a button with the ID "begrüßen". These two elements form the basis for all further steps. Make sure you write the IDs exactly as they appear in the HTML, because upper and lower case matter.

Step 2: The click with plain JavaScript
In the next step, you write the functionality in classic JavaScript. You attach an onclick event to the button that sets the content of the paragraph to "Hallo Dennis" via innerHTML. When you click the button, the text appears in the paragraph. This works reliably, but for every access you have to type out the full command document.getElementById. This very repetitive effort is the starting point for jQuery.

Step 3: Why jQuery reduces the typing effort
Imagine you had to address several elements at the same time. With plain JavaScript, you would repeat the long command every time, which quickly becomes error-prone. jQuery offers a shorthand notation with which you accomplish the same task in a single line. Delete the existing code in the script section so that you can continue working with jQuery without distraction.
Step 4: The dollar sign as the entry point
The central notation in jQuery is $(). In the parentheses you write the selector, that is, the description of the element you want to address. Then you append the desired action with a dot, such as .click(). The dollar sign is the entry point of every jQuery statement, so you should never forget it.
Step 5: Placing the hash for IDs correctly
So that jQuery knows you mean an ID, you must put a hash in front of the name. For the button with the ID "begrüßen", the selector is therefore "#begrüßen". The hash is not a minor detail, because without it jQuery finds no element. Write the selector in quotation marks and make sure the spelling is clean.
Step 6: Connecting the click event with a function
Now you link the button to an action. After the selector comes .click(), and inside it is the function that should be executed on click. Inside this function, you set the content of the paragraph with $("#text").html("Hallo Dennis"). The code is thus significantly shorter than the plain JavaScript version, but remains easy to read.
Step 7: Why the code initially has no effect
If you test the code now, nothing happens. The reason is that a browser doesn't know jQuery on its own. The library must first be made known to the document. You have two options for this: either you download jQuery and put the file in the same folder as your HTML file, or you include the library via a link.
Step 8: Including jQuery via a CDN link
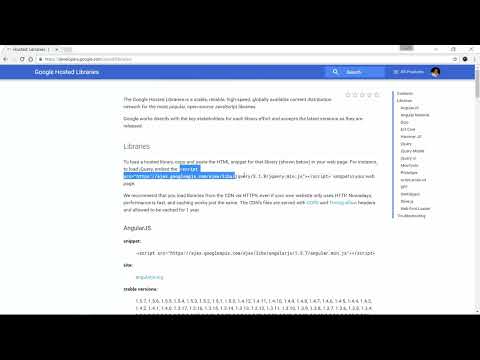
The simplest way is via a Content Delivery Network, or CDN for short. Search in the browser for "jQuery CDN Google" and open the "Hosted Libraries" page. There, under jQuery, you'll find an entry with a script link that begins with https://ajax.googleapis.com. Copy only the link in the src attribute and insert it in the head section of your HTML file.

Step 9: Check the function in a test
Save the file, reload the page and click the button. Now the text "Hallo Dennis" should appear in the paragraph. The process stays the same, only the syntax has changed. You have thus implemented a working click in jQuery and reduced the code to the essentials.
Step 10: Target entire HTML tags instead of individual IDs
jQuery can not only find individual elements by their ID, but also all elements of a certain tag. If you write $("p"), the command affects all paragraphs on the page, regardless of their ID. To try this, add a second paragraph and run the code again. Both paragraphs then show the new text. Make sure that every tag is closed correctly, because a missing closing tag can lead to unexpected results.
Step 11: Distinguish hash, dot and tag name
The distinction between the selectors is a typical source of errors. For an ID you use the hash #, for a class the dot ., and for a tag you write only the name, such as p. If you forget the hash for an ID, jQuery does not find the element, and the click remains without any reaction. If in doubt, therefore, check the selector first before looking for other errors.
Step 12: Create a square as a clickable area
As an exercise, you should now design a red square measuring 150 by 150 pixels. To do this, create a div element with the ID "Viereck". This element no longer needs a button, because the square itself is meant to be the clickable area. The styling is done in the style section via width, height, background color and an outer spacing, which you set to about 10 pixels with margin.
Step 13: Fill the square with text and capture clicks
Replace the content of the square with any text, for example in a paragraph inside the square. Then attach the method .click() to the selector "#Viereck". In the function, you call alert() and pass it the text of the paragraph. You read the text with $("#text").html(), because if nothing is specified in the parentheses, .html() returns the current content. This shows you that the same method serves both for reading and for overwriting content.

Step 14: Read the text and test the message
Write any text in the paragraph and then click on the square. In the browser's alert window, exactly the text you entered beforehand appears. You have thus implemented the entire process: A click on an element triggers a function that reads the content of another element and processes it further.

Summary – Handling jQuery clicks: Controlling buttons and elements via click
You have seen how clicks can be handled in jQuery with just a few lines. The dollar sign with a selector forms the foundation; the hash marks IDs, the dot marks classes, and the tag name marks entire groups of elements. With .click() you link events to functions, and with .html() you read content or set it anew. Including the library remains important, since without it your code has no effect. In the next step, you can look into how the appearance of a web page can be changed with jQuery.
FAQ
Do I always have to include jQuery via a CDN link?No, you can also download jQuery and place the file in the same folder as your HTML file or specify its path.
Why doesn't my jQuery code work even though it looks right?Often the inclusion of the jQuery library is missing, or the selector is wrong, for example because the hash is missing for an ID.
What is the difference between #, . and a tag name in the selector?The hash addresses an ID, the dot a class, and the plain tag name all elements of that tag on the page.
How do I read the text of an element in jQuery?You use the .html() method without an argument, for example $("#text").html(), and it returns the current content.
Can I also use elements other than a button for a click?Yes, you can bind a function with .click() to any element, such as a div square.


