

A spotlight only looks credible when the lens sits at the front. Whether it's a Fresnel lens, barn door, or follow spot: the light cone is created exactly there, and exactly there your model has to be convincing. In this tutorial, you'll build a projection lens in Cinema 4D from a simple cylinder. You'll create the characteristic transition at the rear end and the termination for the gel holder at the front end exclusively by selecting and extruding edges.
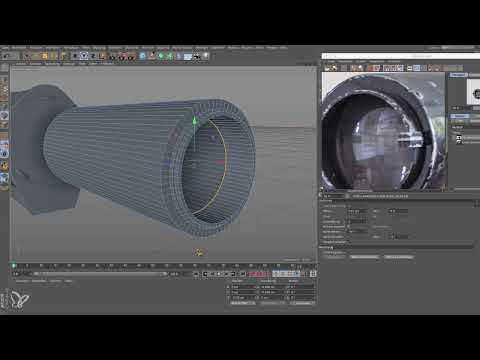
The video is only loaded from YouTube when you play it – data (including your IP address) is then transmitted to YouTube/Google. More in the privacy policy
You should bring basic knowledge of working with Cinema 4D, such as parametric primitive objects, the Attribute Manager, and Edge mode. You should plan about ten minutes for working on your own model.
Key Takeaways
- A parametric cylinder is suitable as a starting shape, but it must be converted into an editable object before editing.
- At least 36 segments are mandatory. 72 segments ensure a clean rounding without visible corners in the render.
- Extruding edges at an angle of 90° creates rings and steps. Small angle steps of 15° result in a soft curve.
- The Bevel deformer with an angle threshold of 40° rounds only hard edges. Flat transitions remain unchanged.
Step-by-Step Guide
1. Create the Base Shape as a Parametric Cylinder
Start with the cylinder from the parametric primitive objects. It is the simplest shape you need for a lens, and it can later be edited further in any direction. At the beginning it still looks like a can, and that is exactly what is intended, because the shape only emerges through the following steps.

2. Set Dimensions and Align
In the Attribute Manager, set the radius to 9.5 cm and the height to 42.5 cm. Then align the cylinder in the Z direction and move it forward a bit. This way you can later easily reach the edges from all sides.

3. Set Segments for the Bayonet
The bayonet at the rear end needs sufficient subdivision. Set the segments to 72. A different number is possible, but it should not be below 36. With too few segments, angular corners appear after rendering, making the object look unrealistic.

4. Remove Caps
Deactivate the caps at the top and bottom. The terminations at the front and back are created through extrusion anyway, and closed caps would only get in the way. This leaves the lens open at both ends, just as the real shape requires.

5. Show Reference Image
In the Picture Manager, load the perspective view of the original as a JPEG and display it. You don't have to open all the images; the view you want to use as a guide is enough. In the image you can see an outer ring at the front, a step, and a recessed tube. You will recreate these details in the following steps.

6. Convert Cylinder and Select Front Edge
A parametric primitive object cannot be edited directly with edges. Therefore, convert the cylinder into an editable object. Then switch to Edge mode and select the complete edge loop at the front rim using Loop Selection. If the selection doesn't work on the first click, simply try again.

7. Extrude Rings at the Front End
Open the Extrude command. The angle is initially set to 0°, so the tube is only lengthened. If you set the angle to -90° and the extrusion to 1.32 cm, the edge bends outward by 90° by exactly that amount. You can keep this value for the following steps.
Now work your way forward in small increments: a bit outward, then inward, outward again, and finally a ring inward that forms the tube. The selection jumps to the new edge after each pass, so you can continue right away. Use the reference image as a guide for the steps rather than fixed numbers.

8. Prepare the rear transition
At the rear end, the cylinder should transition smoothly into the plate. Simply capping it off, however, creates a hard edge that looks unattractive. Therefore, also select the edge there using Loop Selection in Edge mode. Then extrude it with an offset of 0.15 cm and an angle of 165°. This value results from 180° minus 15°.

9. Build up the rounding with Re-transform
With the Re-transform command, you repeat the extrusion. Each pass changes the angle by a further 15°, so to 30°, 45°, 60°, 75° and finally 90°. This turns a hard step into a clean rounding. The subdivision value of the extrusion, which is initially set to 3, can be set to 0, since you don't need it. Afterwards, deselect the selection.

10. Position the lens against the rounding
Now take the lens and push it to the rounded spot. To do this, move in close to the cylinder and position it exactly where it should sit. The bayonet piece lies on the outside and must reach all the way to the cylinder plate. In grayscale mode, you can see the organic connection much better than in the line display.

11. Use the Bevel Deformer
Add a Bevel Deformer and place the lens inside it as a child object. The offset starts at 1 cm and should be lowered to 0.1 cm. Increase the subdivision to 5 so that fine highlights appear on the edges. This costs some computing power, but is worth it at this point. In the line display, the result therefore looks denser than it will look in the end.

12. Activate the angle limit
Activate the Use Angle option and set the limit to 40°. After that, only edges whose angle is greater are processed. The polygons in the rear transition are only 15° apart from each other and therefore remain untouched. The 90° edges at the front, on the other hand, are rounded. This way, you apply the effect specifically where it is needed.

13. Check the result in Gouraud Shading
Finally, switch to Gouraud Shading to assess the result. The lens now looks like it was made in one piece, with a clean transition at the back and a coherent finish at the front. This way, you can quickly see whether the gradations on the foil holder and the connection at the bayonet harmonize.

Summary – Modeling a lens in Cinema 4D: Projection lens via edge extrusion
From a simple cylinder, a credible projection lens emerges with just a few steps. What matters are the right number of segments, converting before editing, and the targeted extrusion of edges with suitable angles. The Bevel Deformer with an angle limit of 40° ensures fine edge transitions in the end, without altering the gentle roundings. With this workflow, you can also transfer the technique to other housing shapes.
FAQ
Why does the cylinder have to be converted before editing?A parametric primitive object can only be changed via its parameters. Only after converting can you select and extrude individual edges.
How many segments are sensible?At least 36 segments are necessary; 72 segments deliver a clean result. With fewer segments, visible corners appear after rendering.
Why does an angle of 0° in the extrusion only cause an extension?At 0°, the surface is continued straight. Only an angle such as -90° bends the edge around and creates the ring.
What is the angle limit in the Bevel Deformer for?With 40°, only edges that bend more sharply are rounded. Flat transitions of 15° remain unchanged.
Can I also model the lens without a reference image?Yes, the dimensions can be estimated. However, the gradations and proportions are then harder to get right.

