
A photo that looks flat and whose shadows appear more gray than deep black can be significantly improved with just a few steps. The Levels adjustment in Affinity Photo is the right tool for this. In this tutorial, you will learn how to create the Levels adjustment as an adjustment layer, how to read the histogram correctly, and how to make the layer act specifically on individual layers or on the entire image. I will also show you how to increase the contrast without unintentionally oversaturating the colors.
The video is only loaded from YouTube when you play it – data (including your IP address) is then transmitted to YouTube/Google. More in the privacy policy
Key Takeaways
- The Levels adjustment is an adjustment layer. It changes the tonal values but leaves the original data untouched.
- The histogram shows the tonal distribution. The shadows are on the left, the midtones in the middle, and the highlights on the right.
- With clipping masks, a Levels adjustment only affects the layer beneath it. This way you control precisely which layer you are editing.
- With the black level you determine which tonal value becomes pure black, and with the white level the brightest tonal value that becomes pure white.
- The Luminosity blend mode prevents the color saturation from increasing when adjusting the contrast.
Step-by-Step Guide
Step 1: Prepare the Source Material
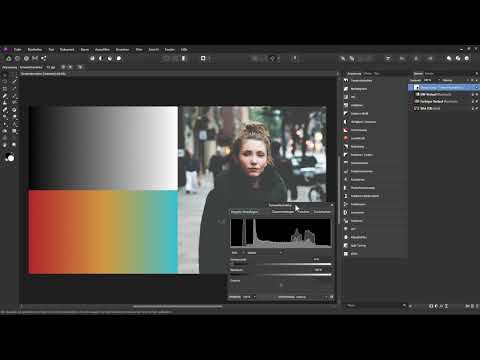
First, open a low-contrast photo. For this example, you additionally place two fill layers on top, one with a black-and-white gradient and one with a colored gradient. This way you can later see exactly how the correction affects different tonal values and colors. All three layers are now in the Layers panel.

Step 2: Create a Levels Adjustment via the Layers Panel
To create a Levels adjustment as an adjustment layer, click the small adjustment layer icon at the bottom of the Layers panel. In the menu that opens, select "Levels". The dialog box with the settings appears immediately.
Step 3: Create an Adjustment Layer via the Adjustment Panel
Alternatively, you can create the adjustment layer via the Adjustment panel. You display it via "View", "Studio" and "Adjustment". Clicking the icon in this panel and selecting "Levels" leads to the same result. Both ways are equivalent, so choose the one that suits your workflow.

Step 4: Understand the Placement in the Layers Panel
Pay attention to which layer you have selected before creating it. If no layer is selected, the Levels adjustment ends up at the very top of the Layers panel. If, however, you select the colored gradient, for example, the new adjustment layer is placed directly above that layer. If you still want to move the layer to a different position, simply drag it with the mouse to the desired position. For this example, you move it all the way to the top so that it affects all the layers below it.

Step 5: Read the Histogram in the Dialog Box
In the Levels dialog box, you see the histogram at the top. It shows the tonal distribution of all layers located below the adjustment layer, combined. You can also display it independently via "View", "Studio" and "Histogram". There it is somewhat compressed and displayed in color.
Step 6: Display the Histogram of Individual Layers
If you only want to see the tonal values of a particular layer, select it in the Layers panel. Then click the "Layer" option in the Histogram panel. Now only the histogram of the selected layer is displayed. This way you can immediately tell whether, for example, the image itself or the gradient is responsible for the problems. In the example, the black-and-white gradient shows an even distribution from black to white, while the image layer lacks highlights and deep shadows.
Step 7: Interpret the Axes of the Histogram Correctly
On the horizontal X-axis, you see the tonal values from pure black on the left to pure white on the right. The vertical Y-axis shows how many pixels in the image have the respective tonal value. If the left area is empty, true black tones are missing. If there is a high peak in the middle, midtones dominate. If pixels are also missing on the right side, there are hardly any highlights. From this distribution alone, you can tell that an image is low in contrast, before you have even made a single adjustment.
Step 8: Use the Levels Adjustment as a Clipping Mask
So that the correction only affects a certain layer, you drag the Levels adjustment onto the desired layer as a clipping mask. In this example, that is the black-and-white gradient. The adjustment layer then only affects this layer. You then control the correction via two sliders: The black level determines which tonal value becomes pure black. The white level determines which tonal value becomes pure white. If you drag the black level to the right, a white line appears in the histogram. All tonal values to the left of it become pure black. You can watch this line live.
Step 9: Controlling the contrast and undoing changes
By moving the black level further to the right, you compress the tonal values and thus increase the contrast. If you overdo it, a large part of the image turns black. This is useful for understanding the effect, but it shouldn't end up in the finished image. With "Reset" you undo the step. The white level works the same way, just mirrored: if you drag it to the left, the tonal values to the right of it become pure white. A moderate use of both sliders is usually enough to make the gradient noticeably higher in contrast.
Step 10: Correcting the colored gradient and protecting the saturation
Now apply the Levels adjustment as a clipping mask to the colored gradient. If you adjust the black and white levels here, not only does the contrast increase, but the saturation of the colors also rises significantly. That isn't always desirable. The layer blend mode "Luminosity" provides a remedy. You can find it in the Levels dialog under "Blend Mode" or in the Layers panel. With the "Luminosity" mode, you only affect the brightness information. The saturation of the colors remains unchanged.

Step 11: Applying the correction to the photo
Now apply the Levels adjustment as a clipping mask to the actual photo. In the photo's histogram, you can see that the darkest areas appear more as a dull gray. Therefore, drag the black level to the area where the darkest pixels begin. This immediately makes the shadows look richer and deeper. Make sure the image doesn't change in an unnatural way.

Step 12: Making the black and white points visible with the Alt key
With a handy trick, you can quickly find out where the darkest pixels are. First drag the black level all the way to the left, then hold down the Alt key (the Option key on a Mac) and click on the slider. If you now drag it to the right, the image first turns completely black. As soon as the first pixels become visible, you know where the tonal values begin. Don't go too far with the black level, as pure black areas can cause problems when printing. So release the slider a few steps before the first pixel. You can check the white level in the same way. In the example photo, however, a strong increase here would blow out the highlights, which is why it's better to leave the white level slider unchanged.

Step 13: Bringing back details with the Gamma slider
If the dark areas have sunk too much after the contrast boost, the Gamma slider helps. If you carefully drag it to the left, you brighten the image a little overall and thus bring back details in the shadows. Pay attention to the skin color and the saturation, for example on the cheeks. If the colors have intensified unintentionally, set the blend mode of this adjustment layer to "Luminosity" again. After that, you only change the brightness and the image looks more natural.
Summary – Levels in Affinity Photo: Controlling contrast and brightness precisely
With Levels, you control the brightness and contrast of a photo flexibly and without destroying the original image. The histogram shows you where the tonal values lie and where corrections are needed. With clipping masks, you limit the effect to individual layers, and with the Luminosity blend mode, you prevent unwanted color changes. The Alt key helps you set black and white points precisely without losing details. I'll cover the channels of individual colors and the tone curves in another tutorial.
FAQ
How do I create a Levels adjustment in Affinity Photo?Click the adjustment layer icon at the bottom of the Layers panel and select "Levels". Alternatively, you can find the option in the Adjustment panel, which you display via View, Studio, and Adjustment.
Why does the Levels adjustment not end up in the right place?The adjustment layer is placed above the most recently selected layer. If no layer is selected, it ends up at the very top. However, you can move it at any time via drag and drop.
What does the histogram show?The histogram shows the distribution of tonal values in the image. The X-axis shows the values from black to white, and the Y-axis shows the number of pixels with the respective tonal value.
What is the difference between the black level and the white level?The black level determines which tonal value becomes pure black. The white level determines which tonal value becomes pure white. Both sliders together control the contrast.
How do I prevent the colors from becoming oversaturated when adjusting contrast?Switch the blend mode of the Levels adjustment to Luminosity. Then only the brightness is changed, and the saturation of the colors is preserved.
What is the Alt key used for with the slider?If you hold down the Alt key and drag a slider, the image shows the areas where the tonal values begin. This way you can see where the darkest or brightest pixels are.


