
You are standing in front of a building but can't step back any further, and the photo shows the facade at an angle: windows tilt backwards, the roofline runs crooked. This is exactly what perspective correction is for. Affinity Photo offers you several ways to do it. In this tutorial you will get to know three of them: the Develop Persona with the Lens tab, the Perspective live filter, and the Perspective tool with two projection planes. I will also show you how to protect the original image.
The video is only loaded from YouTube when you play it – data (including your IP address) is then transmitted to YouTube/Google. More in the privacy policy
Key Takeaways
- Always work on a copy of the background layer, so the original remains unchanged.
- In the Develop Persona, you make corrections using the Vertical, Horizontal and Rotation sliders. These changes are destructive.
- The Perspective live filter works non-destructively, but supports only one projection plane.
- Hold down the Alt key to turn off magnetic snapping to the grid.
- For building corners with two surfaces, use the Perspective tool with two projection planes. Afterwards, crop away the transparent edges.
Step-by-Step Guide
Step 1: Secure the Layer
Before you change the image, you should duplicate the background layer. Select it in the Layers panel and press Ctrl+J. Then rename the copy, for example, to "Perspective Correction". If you hide or delete this layer later, you can return to the original image at any time.

Step 2: Open the Develop Persona and the Lens Tab
Switch to the Develop Persona via the Persona icon at the top. On the right side you will find various tools, including the Lens tab. There you will find the lens correction with the Distortion section. If you had shot with a wide-angle or fisheye lens, you would remove the distortion here first. In the example, you leave the value at 0%, because the correction is done using the Perspective sliders.

Step 3: Show the Grid and Check the Lines
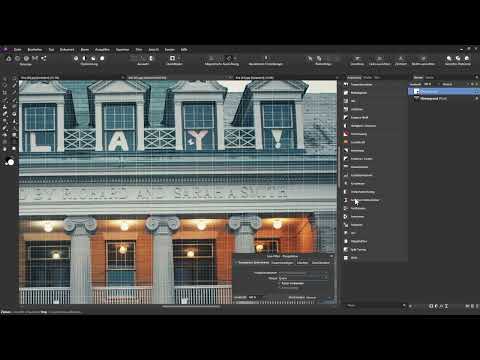
So that you can see where the image is crooked, show the grid via the View menu using the Show Grid option. You now see horizontal and vertical lines. In the example, it is immediately noticeable that the window has no vertical edge, so it tilts backwards. This is exactly what you want to align.
Step 4: Adjust the Vertical Slider
With the Vertical slider, you tilt the image forwards or backwards. Drag the slider to the right and watch the window edges as you do so. Use the vertical grid lines as a guide until the edges lie exactly on them. In the example, the value ends up at just under -50%, which shows how strongly the building was tilted backwards. Check at the left and right edges whether the lines run evenly.

Step 5: Use Horizontal and Rotation Only Selectively
The Horizontal slider tilts the image to the left or right, and Rotation turns it. You don't necessarily need either of them. In the example, the upper line is still not quite right, because it belongs to the building. If you aligned it using Horizontal, another line would go out of plumb. That's why the value stays at 0%. You only use Rotation if the entire image is crooked. Always reset sliders you don't need.

Step 6: Apply and Check the Result
Then click Develop. The change is applied destructively to the Perspective Correction layer. Afterwards, hide the grid again via View and Show Grid. To evaluate the result, show the correction layer once and hide it once, and compare the images.

Step 7: Call Up the Perspective Live Filter
In the second example, the correction should be non-destructive. To do this, select the background layer again. Then open the Filter menu and choose the Perspective entry. A small dialog window appears, and a grid lies over the image. You adjust the perspective using the handles of the live filter.

Step 8: Replace the Grid with a Raster
The grid of the Live Filter distorts along with the image and therefore hardly helps you with orientation. In the dialog window, deactivate the Show grid option so that you have a clear view. Instead, show the grid via View and Show Grid. This one stays unchanged when you make adjustments. If the lines are too dark for you, adjust their brightness or color via View, Configure Grid and Axes.
Step 9: Define the Source in the Dialog Window
Switch the mode in the dialog window from Destination to Source. Now you define the area that you want to change in perspective. Drag the handles to the corner points of the front of the house. In the example, you orient yourself by the edges of the house, the window area, and the house wall. The more precisely the source fits, the cleaner the result will be later.

Step 10: Set the Destination and Distort the Image
Now switch the mode from Source to Destination. The image does not change at first, because now you are setting the target position. Drag the handles to the places where the edges of the house should run vertically and horizontally. Hold down the Alt key while doing so if the handle wants to snap to the grid. For the lower corner points, you orient yourself by the house wall and the rows of windows. You can raise the roof a bit on both sides until the distance to the line is equal.

Step 11: Finish the Correction
As soon as the house facade looks straight, click the X icon to close the dialog. The Live Filter layer now sits above the background layer. If you have further layers beneath it, the filter would affect all of them. In that case, you should place the Live Filter layer as a child layer or clipping mask on the desired layer. You can also set this up automatically via the assistant in Affinity Photo.

Step 12: Crop Transparent Edges
The distortion creates transparent areas at the edge. Take the Crop tool and drag the handles on the right, left, and bottom edges inward far enough that the transparent areas lie outside. With a double-click in the image, you apply the crop.

Step 13: Understand the Limits of the Live Filter
The Perspective Live Filter can only work with one projection plane. In the Projection Planes menu, the selection is grayed out. This is a problem as soon as a building corner with two visible surfaces needs to be corrected. For this case, you need the Perspective tool with two projection planes. However, this method is destructive, so you work on a copy of the background layer.

Step 14: Create a Duplicate and Choose the Perspective Tool
Duplicate the background layer with Ctrl+J and rename it again, for example to "Perspective Correction 2". Then select the Perspective tool from the toolbar. If it is not visible there, you can add it via the toolbar settings.

Step 15: Set Up the Grid and Use Two Projection Planes
First hide the typical grid of the tool and instead show the grid via View. In the Projection Planes area, you now select two planes. They are separated in the middle by a vertical line. This way you can edit both walls separately. Here, too, switch the mode to Source.

Step 16: Define the Source for the Building Corner
In Source mode, drag the handles to the corner of the house. Place the upper handle on the roof edge and the lower one on the building corner at the ground. Orient yourself by the window edges and the house wall. Hold down the Alt key while placing if the magnetism gets in the way. Position the lines so that they follow the house wall, even if part of it can only be guessed at.

Step 17: Adjust the Destination and Check the Result
Then switch the mode to Destination. Now you move the handles until the corner appears straight. Make sure that the two house walls match each other. When you move one handle, the other wall may look crooked. In that case, you also correct the handle on the opposite side. Whether the building should look flatter or more pointed is up to you. Then click Apply and hide the grid again via View.

Step 18: Final Cropping
Here too, the correction creates unsightly areas at the edges. Select the Crop tool again. Crop the top, left, right, and bottom just far enough that no transparent or distorted corners are visible anymore. Confirm the crop by double-clicking in the image. Then compare the before and after images to evaluate the result.

Summary ??? Correcting Perspective in Affinity Photo: Straightening Buildings
You have now learned three methods for straightening crooked buildings in Affinity Photo. The Develop Persona with the Lens tab is quick and easy, but it alters the original image destructively if you don't apply it to a copy. The Perspective live filter is non-destructive and is suitable for simple corrections with one projection plane. For more complex building corners, you need the Perspective tool with two projection planes. In every case, what remains important is the grid as a point of orientation, the Alt key for releasing the magnetism, and the final cropping of the transparent edges.
FAQ
Why should I always work with a copy of the background layer?With a copy, the original image remains unchanged. You can hide or delete the correction at any time and return to the original image.
What does the Source mode mean in the Perspective live filter?In Source mode, you specify which area of the image should be changed in perspective. Only then do you switch to Destination mode and determine where this area should be moved.
Why does the grid move with the image in the live filter?The live filter's grid is distorted along with the image and is therefore of little help for orientation. Deactivate the Show grid option in the dialog window and instead use the grid via View, because it remains unchanged.
How do I deactivate magnetism when placing the handles?Hold down the Alt key while dragging. This causes the magnetic alignment to the grid to be ignored.
Why can't I select a second projection plane in the live filter?The Perspective live filter supports only a single projection plane. For two planes, for example with a building corner, you use the Perspective tool in the toolbar. However, this works destructively.


