
A small portrait retouch often works wonders without making your subject look artificial. That is exactly what this tutorial in Affinity Photo shows you. You remove distracting hairs and blemishes on the skin, neutralize a color cast in the image, and brighten the eyes before giving them a new color. You work exclusively non-destructively, so you can correct every step at any time later.
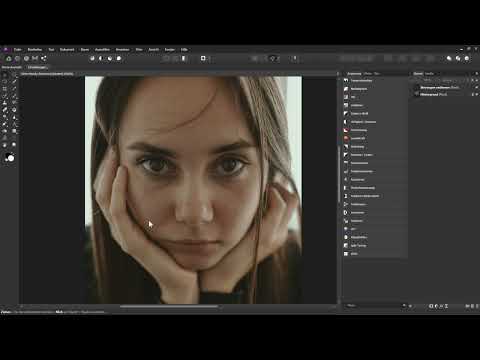
The video is only loaded from YouTube when you play it – data (including your IP address) is then transmitted to YouTube/Google. More in the privacy policy
The guide is aimed at beginners who already know the interface of Affinity Photo and understand how layers and adjustment layers work in principle. A graphics tablet is helpful, but not a must.
Key Takeaways
- You remove distractions on a separate, empty layer with the Inpainting tool. This way the original image remains untouched.
- For areas where the Inpainting tool keeps copying from the same region, the Blemish Removal tool is suitable.
- You identify a color cast with the help of a layer with the average color, which you then neutralize using a White Balance adjustment layer.
- You change the eye color in a targeted way by selecting the iris with the Quick Mask and then applying a Selective Color adjustment.
- With blend modes, masks, and opacity, you control the effect of all adjustments and keep control over the final result.
Step-by-Step Guide
Create an Empty Layer for the Distractions
Before you even pick up the brush, you should create a structure that will save you a lot of work later. To do this, create an empty layer above the background layer using the new layer icon in the Layers panel. Then give it a clear name, for example "Remove Distractions". Only the repaired areas will end up on this layer later. This keeps the original image fully intact, and you can show or hide the corrections with a single click.

Set Up the Inpainting Tool
The Inpainting tool is particularly well suited for skin areas because it is intuitive to use. Select it in the Tools panel. In this example, opacity is set to 100 percent and hardness to 19 percent, which results in a fairly soft transition. Feel free to experiment with these values until you like the result. Also activate pressure sensitivity if you are using a graphics tablet. The brush tip then becomes larger or smaller depending on how firmly you press the pen.
Define the Correct Source
The tool picks the pixels for the correction from the surroundings. This is where a common mistake happens: in the context toolbar, "Current Layer" is set as the source by default. But if you are on your empty layer, the tool finds nothing to copy there. Therefore, change the source to "Current Layer & Below". The tool then accesses the image of the background layer, while your corrections end up on the empty layer.
Fix Distracting Hairs and Blemishes
Now zoom in close to a distraction, for example a single hair across the face. Paint over it once with the brush. The marked area is then repaired. The brush stroke can be a bit wider than the distraction itself, since the tool cleanly picks up the surroundings. If the brush gets too large, make it smaller again, especially in places with fine contours such as eyebrows or eyelids.
Check the Corrections Non-Destructively
A great advantage of this method shows when reviewing. Hide and show the "Remove Distractions" layer again to see the difference between the original and the corrected state. You will also see that only the edited areas are on this layer. If you later think a correction is too strong, you can simply erase part of the layer or reduce the opacity without changing the original image.

Approach Difficult Areas with Patience
With crossing hairs, the Inpainting tool sometimes reaches its limits. You then have two options: either you break the hair at a suitable point, or you place the source as close as possible to another hair and remove it piece by piece. Be especially careful in areas such as the finger or the eyelid. Areas where the skin looks blurry can also be touched up in a targeted way with smaller brush strokes.

Remove stubborn blemishes with the Blemish Removal Tool
Sometimes the Healing Tool keeps picking up the same source area, so the result looks unnatural. In this case, switch to the Blemish Removal Tool. Use it to select the disruptive area and then drag the mouse to a suitable spot nearby. Here, too, make sure to select the option "Current Layer & Below" for the sources, so that the tool can access the image of the background layer. Afterwards, switch back to the Healing Tool and continue your work.

Use the before-and-after comparison
Once you have removed the obvious flaws, it is worth taking a look at the overall image. Show and hide the layer several times and compare the before and after states. You could edit the skin even more finely and cleanly, but that would already be heading toward professional skin retouching. For a small retouch, it is usually enough to correct only the conspicuous areas and preserve the natural character of the face.

Detect the color cast with a helper layer
The next step is about the color cast. To do this, first create a merged layer at the very top of the Layers panel. With Ctrl, Shift, Alt and E, all visible changes are combined on one layer. Then name it, for example, "Color Cast". On this layer, apply the Blur filter and, within it, Average. This determines the average color of the entire image and fills the layer completely with it. You now see exactly the hue that is responsible for the cast.

Neutralize the color cast with White Balance
With this information, you can specifically remove the color cast. Create a White Balance adjustment layer. Select the eyedropper and click once on the color of the helper layer in the image. White Balance then neutralizes this hue. After that, you hide the helper layer again, since it only served for analysis. Compare the result with the original image. Whether you want the image a little warmer or cooler is a matter of taste. For this example, it was deliberately kept a bit more neutral.
Refine the contrast with Curves
To make the image look a bit more vibrant, you can give it more contrast with a Curves adjustment layer. To do this, pull the curve down slightly in the dark area and up slightly in the bright area. Don't overdo it, because too strong a contrast increase quickly looks harsh. Compare the effect with the previous state at short intervals until the image looks balanced.

Select the eyes with a Quick Mask
Now comes the part with the eyes. You want to brighten them and, in this example as a demonstration, also change their color. Keep in mind that with real portraits, you should respect a person's natural eye color unless there is an agreement about a change. To edit the iris specifically, choose the Paint Brush and activate the Quick Mask. Set an opacity of 100 percent and a hardness of zero so that the edges stay soft. Then paint over the iris. After that, exit the Quick Mask, and a selection is created automatically.

Recolor the iris with Selective Color
Now choose a Selective Color adjustment layer. The selection is automatically applied as a mask, so that only the iris is affected. In the Color section, you switch to the Neutrals and adjust the values. Drag the Cyan and Blue sliders toward blue until the desired hue is reached. In the example, the yellow component was greatly reduced and the Black slider was shifted slightly to the right. The result initially looks very unnatural and too blue, which is why the next step is crucial.

Control the brightness via the blend mode
Change the layer blend mode of the Selective Color from Normal to Add. This makes the eyes brighter and colored at the same time, and the effect looks much more natural. Afterwards, you can refine the mask further. Choose white as the brush color to recolor areas again, and black to remove spots that were changed too much. Press the X key to switch between white and black. If necessary, reduce the brush opacity so that you work more carefully.

Refining the mask in a targeted way
Precise touch-ups are especially worthwhile at the edges of the iris and in the upper eyelid area. Paint over areas there with the brush that should be colored more strongly, and remove the coloring at the transitions to the skin or to the white of the eye. Feel free to take your time with this, because clean edges determine how believable the result looks. Finally, you can reduce the opacity of the entire adjustment layer until the eye color looks harmonious.
Giving the overall image a cooler look
In the final creative step, you give the image a slightly bluish color look. To do this, choose Layer, New Fill Layer, and fill it with a lighter shade of blue. Then set the layer blend mode to Soft Light. You control the intensity via the opacity. In the example, the setting at 100 percent already looked very good, but you can reduce it to your taste.

Comparing the result at the end
To finish, create a copy of the background layer and drag it all the way to the top. Show and hide it to compare the original image with the edited version. If the eye color seems too intense to you, reduce it a little more until it looks natural. This gives you a small portrait retouch that changes the color look of the image without making the subject look artificial.

Summary ??? Portrait retouching in Affinity Photo: Editing skin, color cast and eyes
In this tutorial, you have seen how to remove distracting hairs and blemishes non-destructively using an empty layer and the Inpainting tool. You have learned to identify the color cast with the help of an Average filter and to neutralize it with White Balance. Afterwards, you refined the contrast and brightened and recolored the eyes using a Quick Mask and Selective Color correction. With blend mode, mask and opacity, you have fine-tuned every step. Apply the techniques to your own images and practice them until you have mastered them confidently.
FAQ
Why should I make the corrections on a separate layer?On a separate layer, the original image remains unchanged, and you can show or hide, adjust or remove each correction individually later.
Why does the Inpainting tool not find any pixels to copy on my empty layer?The source is set to "current layer" by default. Switch it to "current layer and below" so that the tool uses the image of the background layer.
When should I use the Blemish Removal tool instead of the Inpainting tool?If the Inpainting tool keeps copying from the same spot and the result looks unnatural, the Blemish Removal tool is often the better choice.
How do I recognize the color cast in my image?Fill a copy of the merged layer with the Average filter. The resulting color area shows you the average color of the image, which is responsible for the cast.
How do I neutralize a color cast?Create a White Balance adjustment layer, choose the eyedropper and click on the color of the helper layer. Then hide the helper layer again.
Why do I work with a Quick Mask for the eyes?With the Quick Mask, you mark the iris precisely and get a selection that is automatically adopted as a mask in the adjustment layer.
Why should the blend mode be set to Add?The Add mode makes the eyes brighter and prevents the coloring from looking too artificial. Afterwards, you can refine the intensity via the mask and the opacity.
Should I simply change a person's eye color?No, the natural eye color should only be changed by agreement. The example in the tutorial serves solely to demonstrate the technique.


