
When you design a user interface in JavaFX, rectangular elements quickly stop being enough. A logo, a button with rounded corners, or a game character needs curves. For this, JavaFX provides the shapes Circle and Arc. Circle is the English word for a full round shape, and Arc stands for a curved segment. In this tutorial, you will learn how to create full circles and circular arcs, position them, color them, and put them together to form a small Pac-Man figure. All you need is a working JavaFX environment and a bit of patience while trying out the values.
The video is only loaded from YouTube when you play it – data (including your IP address) is then transmitted to YouTube/Google. More in the privacy policy
Key Takeaways
- A
Circleis defined by its center point (centerX, centerY) and its radius. - An
Arcadditionally requires a radius for X and Y, a start angle, a length, and anArcType. - The start angle is measured from the horizontal line. The length specifies how many degrees of the circle are filled. 270 degrees correspond to a three-quarter circle.
- With
ArcType.ROUND,ArcType.OPEN, andArcType.CHORD, you determine how the arc is closed off. - The order in which you add shapes to the root determines the overlap. Whatever comes later lies on top.
- You set colors with
setFill(). The constructor ofCircleorArcdoes not accept a color.
Step-by-Step Guide
Step 1: Create a BorderPane as the Basic Framework
First, you need a container into which you insert your shapes. In the video, a BorderPane is used for this. You create it as the root element (Root) and add it to your Scene later. The BorderPane is a good choice here because you can easily extend it with additional elements later.

Step 2: Create the Scene with a Fixed Size
The Scene directly receives the root and the desired window size in its constructor. The example works with 200 x 200 pixels. This is a small window in which you can easily see the effects of the values.
Step 3: Create a Circle
A circle is created with the class Circle. In the constructor, you pass three values: the X coordinate of the center, the Y coordinate of the center, and the radius. Alternatively, you can first create the circle empty and set the values with the setters setCenterX(), setCenterY(), and setRadius(). Both variants lead to the same result.
Step 4: Understanding Center and Radius
The coordinates refer to the top left corner of the window, which has the value (0, 0). If the center is at (100, 100) and the radius is 50, the circle sits exactly in the middle of a 200 x 200 window. Feel free to experiment with the values to get a feel for the coordinates. When you hover over the constructor, the development environment shows you the parameters, which makes orientation easier.
Step 5: Add the Circle to the Root
A shape only becomes visible once you add it to the scene graph. This is done via the list of children of the root element. You access this list with getChildren(). Add the circle with add().

Step 6: Adjust the Radius
If you increase the radius to 100, the circle fills the entire width and height of the window, because the window is 200 pixels wide and tall. The center is at (100, 100) and the radius is 100, so the circle touches the edges exactly. With this test, you can see very clearly how radius and window size are related.
Step 7: Set the Color of the Circle
You set the color of a shape with setFill(). The colors come from the class Color. In the video, Color.BROWN is used first, which in JavaFX gives a rather reddish-brown tone. You can also use Color.YELLOW or define your own colors with Color.web("#FFC800") or Color.rgb(255, 200, 0).
Step 8: Creating an Arc
An Arc is similar to a circle, but it has a cut-out section. It is created with the class Arc. The constructor requires six values: the center X and Y, the radius X and Y, the start angle, and the length. You then set the type with setType(). In addition, you must import the classes Arc and ArcType.

Step 9: Understanding the Parameters of the Arc
As with the circle, the first two values define the center. The radii X and Y are separate because, in theory, an Arc can also be elliptical. With equal values, a round arc is created. The start angle determines where the arc begins. The length indicates how many degrees it spans. An angle of 0 degrees lies on the right on the horizontal line. Positive lengths are drawn counterclockwise, negative lengths clockwise.

Step 10: Trying Out Start Angle and Length in Practice
With a start angle of 45 degrees, the arc begins on the diagonal toward the upper right. A length of 270 degrees corresponds to a three-quarter circle, that is, three quarters of the full circumference. Change both values one after the other and observe how the arc shifts and shortens. After a few attempts, you will understand the principle intuitively.

Step 11: Choosing the ArcType
The ArcType determines how the ends of the arc are connected. With ArcType.ROUND, a circular sector is created, that is, a pie slice connected to the center. This gives the typical Pac-Man shape. ArcType.CHORD connects the two endpoints directly with a chord, creating a circular segment. With ArcType.OPEN, only the arc itself is drawn without any connection. With a fill, OPEN looks like a simple line.
Step 12: Building a Pac-Man Figure
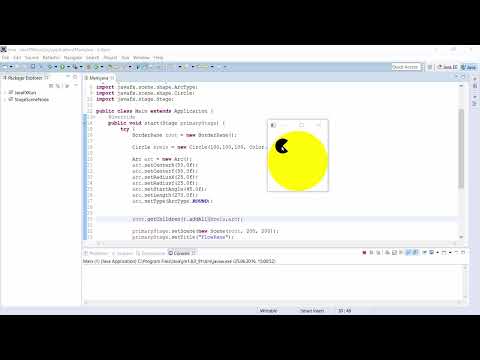
Now you combine both shapes. The yellow Arc forms the body, and a small black circle forms the eye. For the eye, the values center (110, 55) and radius 12 are suitable. The center of the body stays at (100, 100) with a radius of 75 and a start angle of 45 degrees as well as a length of 270 degrees. Make sure that the eye lies within the arc.
Step 13: Paying Attention to the Drawing Order
The order plays an important role. If you add the eye before the body, it will be covered by the yellow arc and will no longer be visible. Therefore, add the Arc first and the circle afterward. The circle then lies on top of the arc.
Step 14: Looking Ahead to the Canvas
You can also draw the same shapes on a Canvas. For this, you use the GraphicsContext, for example with fillOval() for circles and fillArc() for arcs. The logic with coordinates, radii, angles, and types remains the same. Try it out so that you can reliably distinguish between both approaches.

Summary ??? JavaFX Circle and Arc: Drawing Circles and Pac-Man Arcs
In this guide, you have learned how to create circles with Circle using a center and radius, and how to design arcs with Arc using start angle, length, and ArcType. You now know that colors are set via setFill() and that the order in which you add elements to the root determines the overlap. With this knowledge, you can deliberately implement round elements in your JavaFX applications. In the next step, it is worth taking a look at Polyline and Polygon, with which you can draw arbitrary line paths and polygons.
FAQ
What is the difference between Circle and Arc?A Circle always draws a complete, closed circle, whereas an Arc represents only a section of the circumference, which you define via start angle and length.
Why is the eye not visible in my Pac-Man figure?The circle was probably added before the yellow arc. Add the Arc to the root first so that the circle lies above it.
How do I use custom colors instead of the predefined colors?You can specify an RGB value with Color.rgb(255, 200, 0) or use a hexadecimal value with Color.web("#FFC800").


