
Imagine your comic character should look grimmer, more mischievous, or simply more striking, without you having to draw every pixel by hand. That is exactly what the Liquify tool in Photoshop is suited for. In this tutorial, you will follow a complete workflow: from the prepared Smart Object, through protecting important areas, to the fine-tuning of eyebrows, eyes, nose, lips, and ears.
The video is only loaded from YouTube when you play it – data (including your IP address) is then transmitted to YouTube/Google. More in the privacy policy
Key Takeaways
Always work on a Smart Object. This way you can open the filter at any time and readjust it without destroying the original image. Protect areas you do not want to change before you move anything. Proceed step by step, start with the eyebrows, and work your way through the eyes and nose to the lips. Small shifts often have a stronger effect than large interventions. Compare before and after regularly to check the effect. Accept small pixel distortions at the edges, as they are hardly noticeable in a painterly or comic-style look.
Step 1: Preparation with Smart Object and Liquify Filter
Before you make the first brushstroke, place the face on its own layer. To do this, duplicate the background layer and convert the copy into a Smart Object. With a right-click on the layer, you will find the command "Convert to Smart Object". Then open the dialog via "Filter > Liquify". The advantage of this approach is obvious: The filter remains as a Smart Filter, and you can reopen it at any time later and extend or correct your changes.

Step 2: Securing Important Areas with the Freeze Tool
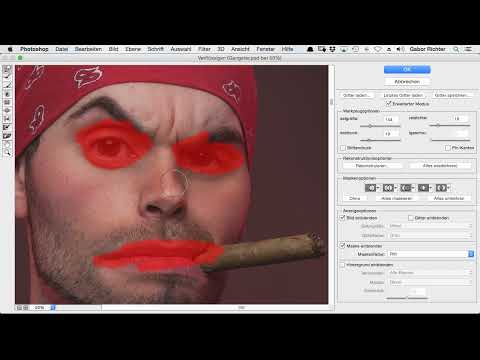
Liquify is a fairly rough intervention, and that is exactly why you should first determine what should remain untouched. Use the "Freeze" masking tool for this. With a brush, you paint over the areas you do not want to move, such as the eyes if you are initially only working on the eyebrows. You can recognize protected areas by the colored overlay. You do not have to be perfectly precise, as the only important thing is that the respective area is completely covered. A practical tip: Work with a small brush size in tight areas such as the eyelid and increase the brush size for larger areas.

Step 3: Making Eyebrows Sharper and Grimmer
With the eyebrows, you often give the face its decisive character. First protect the eyes so that they do not move along unintentionally. Then use the Forward Warp tool to pull the outer sides of the eyebrows upward and push the inner sides slightly downward. This creates a sharp angle that reinforces a grim expression. Make sure you work in small steps. With comic characters, even a minimal shift is often enough to make the effect clearly visible. You do not have to make each eyebrow identical, as a slight difference often looks more lively.
Step 4: Making Eyes Look Rounder and Bigger
With the eyes, the aim is to make the gaze appear softer or rounder if the original looks slit-like. First protect the areas that should not change, such as the eyebrows and surroundings. Then move the eyelids as well as the sides of the eye outward or downward, respectively. This makes the eye look more open and rounder. You should treat the iris especially carefully, as too strong distortions quickly change the shape of the pupil and look unnatural. So move it only slightly and check the result again and again.

Step 5: Checking Progress with the Mask View
Once you have edited several areas, an interim check is worthwhile. In the Liquify dialog, in the View Options section, you will find the setting "Show Mask". If you deactivate it, you no longer see the protected areas, and the image shows the pure result. The mask remains active, it is only hidden. Switch regularly between both views so that you can assess the distortions realistically. The before-and-after comparison also helps: You immediately recognize whether the eyes really look rounder or whether you have gone too far.
Step 6: Correcting Mistakes Without Starting Over
Not every shift works on the first try. If you have deformed an area too strongly, you do not have to undo it completely. Simply pull the affected areas back in the opposite direction until the shape is right again. With the Reconstruct brush, you can also reset distortions, but it should rather be used for small mishaps. Especially with comic styles, some irregularity may remain, so you do not have to perfect every millimeter.

Step 7: Shaping the nose into a button nose
With the nose, small, targeted adjustments are what matter. To create a button nose, you push the bridge of the nose up slightly and shrink the overall shape of the nose a little. You gently pull the nostril wings inward so that the nose looks shorter and more compact. You narrow the nostrils with small movements until they match the desired size. Since the nostril wings are rarely identical on both sides, even them out at the end. To do this, protect the eyes and the lips so that they are not deformed along with the nose when you move it.

Step 8: Adjusting the lips and corners of the mouth for expression
To reinforce a grim facial expression, you don't necessarily have to enlarge the lips. Often it is enough to pull the corners of the mouth down a little. To do this, place the Warp tool at the corners of the mouth and work step by step. Afterwards, you can push the upper lip up slightly so that the mouth looks fuller without appearing exaggeratedly large. Make sure that the lip line stays straight, as otherwise a crooked impression quickly arises. A small correction on one side may be necessary later if the mouth feels asymmetrical.

Step 9: Making the ears rounder and smaller
The ears also strongly influence the overall impression. To make them smaller and rounder, you push the outer edge up and press the shape slightly inward. Then you gently reshape the curve until the ear fits harmoniously with the head. You can leave conspicuous bulges if they suit the character. A rather irregular or angular shape actually looks more believable on a combative character than a perfectly smooth ear.

Step 10: Checking the overall effect and finishing up
Finally, you look at the result from a bit of distance. Zoom out, switch between the before and after views, and decide whether the changes work together coherently. When you are satisfied, you confirm the filter. Since the image is available as a Smart Object, you can return at any time, open the Liquify filter again, and refine the details. This flexibility is the greatest advantage of the whole workflow, because with character designs in particular, ideas often only come after some time.

Summary – Liquifying comic faces in Photoshop: How to change facial expressions in a targeted way
You have learned how to change a comic-style face with the Liquify filter in Photoshop. The workflow begins with the Smart Object so that you stay flexible. Then you protect areas that should remain unchanged and work your way forward step by step: eyebrows, eyes, nose, lips, and ears. Check your progress regularly with the mask view and the before-after comparison. Small, careful shifts usually achieve the best effect, and small irregularities may well be retained in the comic style.
FAQ
Do I absolutely have to work with a Smart Object?No, that is not strictly necessary. However, a Smart Object has the advantage that you can reopen and adjust the Liquify filter at any time.
What is the Freeze Mask tool for?With the Freeze Mask tool, you mark areas that should remain unchanged during liquifying. This prevents, for example, eyes or lips from being distorted unintentionally.
What do I do if I have distorted an area too much?Simply pull the area back in the opposite direction until the shape is right. The Reconstruct tool can also help, but it is mainly suited for small corrections.
Why do some pixels disappear or distortions appear at the edge?When liquifying, pixels are shifted, which means image information can be lost or look blurry in some places. In the comic style, this is often hardly noticeable.
Can I still adjust the changes later?Yes, if you work with a Smart Object. You reopen the filter via the layer and continue editing your shifts.


