
Expressive eyes often decide whether a comic character looks alive or stays flat. This is exactly where this tutorial comes in. You will learn how to use the dodge-and-burn technique to selectively darken and lighten eyes and eyebrows so that they appear more three-dimensional and stronger. The method can deliberately be exaggerated, because a comic face thrives on such stylistic devices.
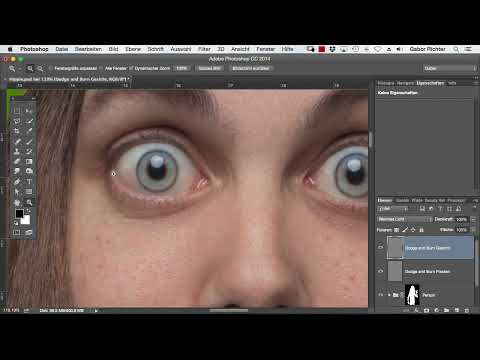
The video is only loaded from YouTube when you play it – data (including your IP address) is then transmitted to YouTube/Google. More in the privacy policy
Key Takeaways
- A separate dodge-and-burn layer in "Soft Light" mode with 50% gray keeps all corrections non-destructive and leaves the original image untouched.
- Darker eyebrows and an emphasized eye contour deliberately draw the gaze to the eyes.
- A darkened surrounding area makes the iris appear brighter and stand out more, because the eye automatically moves from dark to light.
- With low opacity and several gentle strokes, you shape the eyeball to look round.
- With comic characters you may exaggerate, while with realistic people you should be much more restrained.
Step-by-Step Guide
Step 1: Prepare the Dodge-and-Burn Layer
First, create a new layer intended exclusively for your darkening and lightening. To do this, hold down the Alt key and click the layer icon at the bottom of the Layers panel. A dialog window opens right away in which you can name the layer. Name it, for example, "Dodge and Burn Face" so you can find it again quickly later.
Set the blend mode to "Soft Light" and fill the layer with 50% gray. This neutral gray area does not change the image at first. Only when you darken with black or lighten with white do light and shadow become visible. This way you can go back at any time without damaging the actual image.

Step 2: Darken the Eyebrows
In the next step, you take care of the eyebrows. They form the upper frame of the eye, and darker brows give the face more weight. Choose a soft brush, set the foreground color to black, and gently stroke over the brows. It is better to work in several light passes than in a single hard stroke.
The effect is deliberately exaggerated, because in reality only a few people have such striking brows. With a comic character, however, this emphasis ensures that the gaze falls first on the face and then on the eyes. Regularly compare the result with the original state by briefly showing and hiding the dodge-and-burn layer.

Step 3: Emphasize the Eye Contour and Iris
Now it's time for the eyes themselves. Choose a brush about 6 pixels in size and darken the outer contour of the eye as well as the area around the iris. Make your strokes precise, but not rigid, so that the transition stays natural.
Then edit the second eye right away with the same brush. This way you don't have to constantly change the brush size, and both eyes receive the same treatment. Make sure the contour looks as symmetrical as possible on both sides, because differences are immediately noticeable in faces.

Step 4: Darken the Pupil and the Black of the Eye
Next, it's the pupil's turn. Increase your brush to about 14 pixels and darken the area of the black of the eye further. This makes the eye look deeper and the contrast with the iris increases significantly. If the brush extends too far beyond the iris, you can correct that with a smaller size or by selectively lightening in the next phase.

Step 5: Enhance the Light Reflections in the Eyes
In the eye you can usually see a small reflection that breathes life into the gaze. You can make this reflection even more distinct. To do this, press the X key to switch the foreground color from black to white. Then use a soft brush to stroke over the reflection until it looks brighter.
The points of light should stand out clearly from the rest of the eye without looking pasted on. A quick look at the before-and-after effect shows you whether the reflection achieves its goal. Many artists also check the image at a slightly different zoom level to make sure the effect also works in the overall view.
Step 6: Applying the Eyeliner Effect to the Lower Lid
To give the eye a striking frame, you can darken the lower lid as if with eyeliner. For this, choose black as your color again and a brush with a size of about 10 pixels. Gently stroke along the lower lash line.
Since the perspective on the face can make working difficult, it's best to rotate the canvas from time to time. To do this, press the R key to activate the Rotate tool, and move the mouse or your graphics tablet until you have found the most comfortable position. With the spacebar, you can also move the image section while you work.

Step 7: Darkening the Surroundings for a Smokey Look
The so-called smokey look relies on the eye area being darker than its surroundings. Dark areas around the eye make the iris stand out more, because the human eye automatically moves from dark to light areas. Use this principle deliberately by darkening the area around the eye with the brush.
Make sure that the darkening fades out softly toward the outside. Hard edges quickly look messy and can disrupt the comic style. If you finally view the eye in isolation by Alt-clicking the Dodge and Burn layer, you will see how much the eye area is now in focus.

Step 8: Giving the Eyeball More Dimension with Shape
An eyeball looks round because light and shadow follow its curvature. You can compare this principle with a simple example: A soccer ball looks three-dimensional because its outer edges are darker than the center. Apply this thinking to the eye by slightly darkening the outer area.
To do this, reduce the brush opacity to about 3% and go over the outer areas of the eyeball several times. The low opacity ensures that you can control the amount of each stroke. The inner area, on the other hand, you brighten only minimally. If the effect becomes too strong, you correct it with a white brush stroke. Switch sides again and again so that both eyes are shaped evenly.

Step 9: Brightening the Inner Area and Balancing the Shape
So that the eyeball doesn't look too flat, in the next step you carefully brighten the inner area. To do this, set white as your color and lightly go over the central parts. The brightening must be very subtle, because in some places it can quickly become too much.
Afterwards, check both eyes next to each other. You often have to rework one side a little because the light distribution turns out differently. Tip: Zoom out briefly every now and then, because in the close-up view, corrections often look stronger than they actually are in the overall picture.
Step 10: Checking the Result and Determining the Strength
Finally, look at the result from a bit of a distance. Toggle the Dodge and Burn layer on and off several times to see the before-and-after comparison. You will notice that the eyes look higher in contrast and that the focus is clearly on them. At the same time, the face gains a more three-dimensional, more artificial look that fits well with the comic style.
The strength of the editing is crucial. With a comic character, you can exaggerate significantly. If, however, it is a real person, you should noticeably tone down the effects, for example via the layer opacity or by using fewer strokes. That way, the result remains believable.

Summary – Dodge and Burn for Comic Eyes: Three-Dimensional Eyes Step by Step
With a separate Dodge and Burn layer in "Soft Light" mode, you work flexibly and retain full control over your image. You have learned to make eyebrows and eye contours darker, to emphasize the iris through a darkened surrounding area, and to shape the eyeball with subtle brush strokes. You can use the eyeliner effect, the smokey look, and the light reflections depending on the desired expression. Keep in mind that the intensity depends on the style: With comic characters, you may boldly exaggerate; with realistic portraits, you should remain cautious.
FAQ
Do I absolutely need a graphics tablet for this technique?Answer: No, you can do everything with the mouse, but a graphics tablet makes fine brush strokes and controlling the opacity easier.
Why shouldn't I edit the Dodge and Burn layer directly on the image?Answer: A separate layer with 50% gray remains correctable at any time, and the original image is preserved unchanged.
How can I tell if my editing is too strong?Answer: Toggle the layer on and off regularly and view the image in the overall view, because exaggerations are noticed more quickly there than in the close-up view.
Can I also use this technique on real people?Answer: Yes, but you should significantly tone down the effects, for example via lower opacity or fewer strokes, so that the result looks natural.


