
Introduction
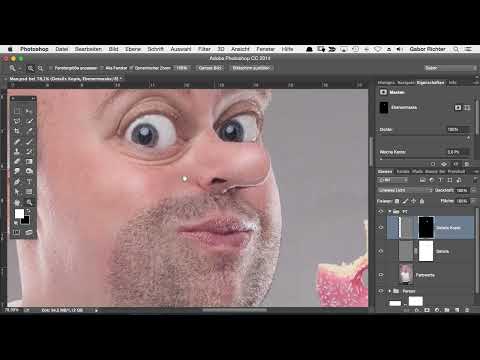
The video is only loaded from YouTube when you play it – data (including your IP address) is then transmitted to YouTube/Google. More in the privacy policy
Anyone who shapes a face in Photoshop with the Liquify filter knows the problem: the pixels are heavily shifted and stretched, and the fine skin texture is lost. On noses, cheeks, or jawlines, the result quickly looks as if the surface were wrinkled or smeared. This tutorial shows you how to use frequency separation to bring back the lost skin details without laboriously retouching every area by hand.
Key Takeaways
Frequency separation splits your image into color values and details. This lets you edit skin texture independently of color and brightness.
You copy details onto a new layer by holding down the Alt key. This leaves the original untouched and you can go back at any time.
With a layer mask, you determine where the transferred details are visible. Inverting the mask and painting with a soft brush at 40 to 50 percent opacity ensures smooth transitions.
For large damaged areas, it is worth duplicating an intact skin area and placing it over the damage in a targeted way.
Step-by-Step Guide
Step 1: Recognize the Problem
Before you get started, take a close look at your image. The Liquify function not only distorts the shape but often also destroys the pixels themselves. The nostrils, cheek areas, and transitions to the contour are especially affected. Pay attention to where the texture is still present and where it is completely missing. These spots will be your target later. The nose of your comic character in the example shows very clearly how badly the pixels can suffer.

Step 2: Prepare the Frequency Separation
Frequency separation is the foundation for everything that follows. The image is split into two layers: the color values, meaning tones and brightness gradients, sit on one layer, while details such as pores, lines, and skin texture sit on another. Make sure both layers are correctly separated before you begin the repair. Only then can you move the details in a targeted way without changing the colors.

Step 3: Identify Damaged Areas
Now look at the detail layer and specifically search for spots where no skin texture remains. There are often areas that simply look smooth or broken. Other areas, such as on the cheek, still retain their details well. Make a note of these intact zones, because you can take the texture from them later. The damage is often strongest at the nostrils and the contour.
Step 4: Duplicate Details
Now comes the actual trick. You don't have to work with the Clone Stamp; you can move the details directly. Select the detail layer, hold down the Alt key, and drag the layer to the desired position. A duplicate is created automatically. The original layer is therefore preserved, and you have a new layer with the pixels you like. Then move it exactly to where the texture is missing, such as onto the nose.

Step 5: Create and Invert a Layer Mask
Now create a layer mask for the duplicated layer. Since the mask initially shows everything, you need to invert it. To do so, press Cmd + I on a Mac or Ctrl + I on Windows. The mask is now black, and the details are invisible. In the next step, you paint them back in selectively.

Step 6: Paint in Details with the Brush
Choose a soft brush and set the opacity to about 40 to 50 percent. With this low setting, you can build up the details layer by layer instead of applying them at full strength right away. Paint over the affected area completely with white in the mask. The skin texture then appears where you paint. Be careful not to work too harshly, otherwise the transitions will look artificial.

Step 7: Link layers and fine-tune details
One advantage of this method is flexibility. If you unlink the layer from the mask, you can move the details independently of the mask. This way you find the position where structure and shape fit together harmoniously. Move the details until the transition looks coherent. Often you only have to move a few pixels to make it look natural.

Step 8: Check the result
Regularly show and hide the layer to check the difference between before and after. This helps you assess your progress realistically and avoid overcorrection. You can keep painting at any time if individual areas still seem too smooth. Especially with larger interventions, this comparison is worthwhile, because the eye quickly gets used to a result.
Step 9: Remove distracting details
Not every attempt succeeds right away. If you don't like a spot, such as the nose, hide the detail layer and delete the mask if necessary. Afterwards you can remove the distracting details in a targeted way. Pay attention to the contour, because if you remove too much, an unnatural edge will result. Therefore, leave the edge of the figure intact and work only within the area.

Step 10: Transfer details from an intact area
Drag details from an intact area, such as the cheek, onto the damaged spot. Here too, you invert the mask and paint the structure into the image in a targeted way. In the end you have a result that looks significantly better than before. If it is not yet perfect, you can move the details again until the transitions are right.

Step 11: Repair large areas efficiently
For large areas, it is faster if you duplicate a completely intact skin area. Drag this area as a whole layer over the damaged spot, mask it, and paint only where the structure fits. This method saves a lot of time, especially if details are missing in several places. The effort is especially worthwhile if you want to repair several areas at once.

Summary – Frequency separation: Repairing liquified skin in Photoshop
With frequency separation, you bring back lost skin texture after liquifying, without changing the colors. You separate details and color values, move the details to a new layer while holding the Alt key, and control visibility via an inverted mask. With a soft brush at 40 to 50 percent opacity, you build up the structure step by step. Check the result regularly by showing and hiding the layer, and pay special attention to the contours. For large damage, duplicating an intact area is worthwhile.
FAQ
Do I have to have the frequency separation already done before I start?Yes, the details and the color values should be on separate layers so that you can edit the structure in a targeted way.
Why do I have to invert the mask?A new layer mask shows everything by default. By inverting it, it becomes black, so the details are initially hidden and you can paint them in in a targeted way with white.
Which opacity is recommended for the brush?About 40 to 50 percent is a good guideline. This way you can build up the structure in layers and avoid hard transitions.
Why should I spare the contours when removing details?If you work on the contour too much, unnatural edges result. Therefore, leave the edge of the figure untouched if possible.
Can I still adjust the details after moving them?Yes, by unlinking the layer from the mask, you can move and fine-tune the details independently of the mask.


